Showing posts with label Cookies. Show all posts

Saturday, January 23, 2016

Biscotti, A Christmas Tradition

My dad loved my Hazelnut Biscotti.  I've hit on a recipe with a couple tweaks that makes a delightful biscotti.  Why hazelnut?  My dad loves hazelnuts.  As a young girl I decided I would crack open a bag of hazelnuts for my dad to eat every Christmas.  You couldn't buy them shelled back then.  I thought a fresh bag of shelled hazelnuts would be a nice treat for him.  45 years later I still do it, well, I can buy them shelled now.  We also encountered a problem about 15 years ago.  My dad ate the whole bag of shelled hazelnuts and got a stomachache from the beyond world.  A 3 day stomachache.  I had that same stomachache when I ate too many homemade macaroons.  3 to be exact.  So coconutty that they sand papered my stomach lining for 3 days and I've never been so miserable.  I didn't want my dad to ever have another stomachache at my expense.

I had nearly a year to decide what to do.  Keep the tradition the same.  He's a big boy and hopefully learned his lesson.  Or try something different, but keep it along the same lines.  I decided I'd make Hazelnut biscotti.  I spread his hazelnuts out over a gallon sized bag of biscotti.  If he ate all the biscotti in one sitting then there's just no help for that gluttony.

I've tried several recipes over the years.  All good, but all not quite right till I found this one.  It takes me about 2 hours to make a double batch.  Fills 2 gallon sized ziploc bags.  I put one bag in his freezer and wrap the other for Christmas day.  Its never put under the tree as we all have dogs and you can guess what would happen.  So, it sits up high on the mantel teasing my dad.  He's a patient man.

When Christmas comes everyone wants a cup of coffee and a biscotti.  My dad is pretty generous, but he keeps control of the bag and doles out one piece per person.  My daughter joked today that he'd use the ole "toddler trick" if any one asked for 2.  You are offered one biscotti and when you ask for two he'll turn his back snap it in two and turn around and give you "2."

This year we decided no gifts as my parents are pushing 80 and I really don't want them out shopping during cold and flu season.  They really don't want to be out doing that either.  I did however still make biscotti.  My dad did say, "Hey, I thought no gifts?"  I replied it's not a gift it's a Christmas tradition.

Tuesday, December 9, 2014

There Are Still Cookies In My Life

Got the cookie bug this weekend.  I have a party or two to go to and thought I should get to baking.  I had spotted these snicker bites at the store.  Thought they'd be great on my Peanut Butter Blossom recipe instead of the Hershey's Kiss.  Time to experiment.
 Above cookies were straight out of the cookie scoop.  Wasn't sure I liked the au naturel look.
 So, for the next batch I rolled the cookies into ball.  Gave a smoother look to the cookie.
In the end I think I liked the craggy look of the cookie.  Bonus it's less work.  Don't need to roll every cookie ball.  I put a pinch of holiday sprinkles on each when they were melted.  I don't think I liked the strange crunch they gave the cookie.  Next time I'll leave them off.  The cookie was very good.  I liked the extra peanut taste of these cookies.  For me the PB Blossoms with the Hershey's Kiss was too much.  Too much chocolate.  Plus once the kiss firms up on top of the cookie its a pretty firm bite.  Do I put the whole cookie in my mouth?  It's kind of big.  If I bite it in two the kiss falls off the cookie.  These cookies with the Snicker bite are soft and stay intact when bitten.  Win Win for me!

Sunday, June 9, 2013

Molasses Cookie Baskets (with a minor tweek)

In May I was asked to bring a dessert to a get together.  It was already getting hot, so I wanted to bring something that would be good, refreshing and would use seasonal fruit.  I like to treating my family to something wonderful even if it takes some time and effort to make.  BUT I like things to be easy if they can be.

I found this recipe for Molasses Cookie Baskets served with Lemon Sorbet and Blueberries with a Ginger sauce.  Not only did it sound good, but I knew it would just look impressive.  Brown little baskets filled with yellow sorbet and bright blue berries.
The instructions for making the baskets in the oven sounded a bit precarious according to the comments.  Getting them off the heated cookie sheet in one piece sounded pretty challenging.  Draping them over a cup to shape them while still hot and hoping they didn't break.  Not only would they not look impressive broken, but I wouldn't be good company if I spent an afternoon wrestling with them.  I thought why not try the recipe on my waffle cone maker.  It's pretty simple to use.  I've had great success with it. I wouldn't have to heat up the big oven on a hot day either.

The batter made as the recipe says did not work in the waffle cone maker.  It was more sugary and candy like.  Where as a cone is crispy and more cookie like.  That made me think I need to fix the batter so it more closely resembles waffle cone batter.  I got out one of my waffle cone recipes and began adding flour and egg to firm up the batter when it's baking in the waffle cone maker, yet keeping the delicious molasses, ginger and lemon flavorings.

They turned out great and were very easy to create cups.  I served mine with only blueberries as that's what's in season in May.

Molasses Cookie Baskets
(with Lemon Sorbet and Gingered Fruit )
Syrup
1 cup sugar
1 cup water
1/2 cup minced crystallized ginger

Cookies
1/2 cup unsalted butter
1/2 cup sugar
1/2 cup light unsulfured molasses
1 tsp grated lemon peel
1 tsp ground ginger
2 tsp vanilla extract
1 ¼ cup all purpose flour, sifted
1 large egg
1 large egg white

Fruit
1 pint strawberries, hulled, quartered
1 1/2-pints blueberries
2 peaches, peeled, pitted, sliced
2-4 pints purchased lemon sorbet

Syrup: Stir first 3 ingred. in small saucepan over med. heat until sugar dissolves. Increase heat and boil 3 mins. Refrigerate ginger syrup. (Syrup can be prepared 1 week ahead.)

Cookies: Bring first 5 ingred. to simmer in small saucepan over med. heat, stirring constantly. Remove from heat. Whisk in vanilla, then flour. Cool cookie mixture 10 minutes. Then whisk in eggs.

Preheat Waffle Cone Maker. Spray lightly with non-stick cooking spray. Wipe off excess. Drop mixture by level tablespoonfuls on to preheated Waffle Cone maker. (1 T for small bowls. 2 T for large bowls with ruffled edge.)
Working quickly, lift cookie from Waffle Cone maker. Drape cookie over inverted 3/4-cup custard cup. Gently shape cookie with another 3/4–cup custard cup on top; this will automatically crimp sides to form fluted cup when doing the 2T amount. Repeat baking and molding process with remaining batter. When one cookie is baking remove cookie from custard cup to cool on storing plate. 

There is another custard cup under the cookie creating the cookie shape.
To serve: Place 1 cookie on each plate. Fill each with 3 small scoops of sorbet and spoon fruit and ginger syrup over.

Bon Appétit | August 1992
Yield: 32 small baskets or 16 large baskets
And yes everyone was deliciously impressed.

Saturday, September 8, 2012

The Hybrid!

I don't know what to call these except wonderful!  Maybe they should have sinful in the title some where too.  My daughter said, "We should call them "The Hybrid", because they are an offspring of two different baked goods."  I said, "I like it!"

I got the idea to make them from a picture I saw on Pinterest.  I clicked on it and it took me to "My Pampered Kitchen Adventures" Blog.  Click on the link and slowly scroll down and you'll see the picture that intrigued me.  I knew some day I was going to make these wonderful looking brownie/cookie concoctions.  I didn't know it was a Pampered Chef pan at the time.  I had only seen the picture on Pinterest.  While placing an order with my Pampered Chef lady I saw this pan and ordered one.  Not knowing I had the exact pan I needed.  The pan has been hanging out in my kitchen for a few months.  I come a across it every now and then and think I need to make that recipe.  Then life gets in the way.

Well, my daughter was off on one of her surfing trips with friends and I like to send them with a bag of treats even though they aren't kids anymore.  I love surprising them with something yummy and they love getting something yummy.  I decided to make these squares of deliciousness.  Only problem I didn't really have time to make cookie dough or brownie batter.  I decided to follow the blog's recipe exactly and use store bought cookie dough and a brownie mix

 
Thanks to the blog's pictures I could see that she had over filled the pan and I didn't want mine to turn out like that. I wanted neat little squares. I wanted to try and use the smallest amount of cookie and brownie to cover the filling. Some people had suggested that their cookie/brownies got stuck in the pan. I decided to spray my pan with Pam and hope mine didn't get stuck. I felt pretty good that they wouldn't, because cookie dough is the bottom layer and it just doesn't stick. I wasn't going to put in too much brownie mix, so it wouldn't overflow making the whole thing stick. Plus I sprayed my nonstick pan really good with nonstick cooking spray.

 
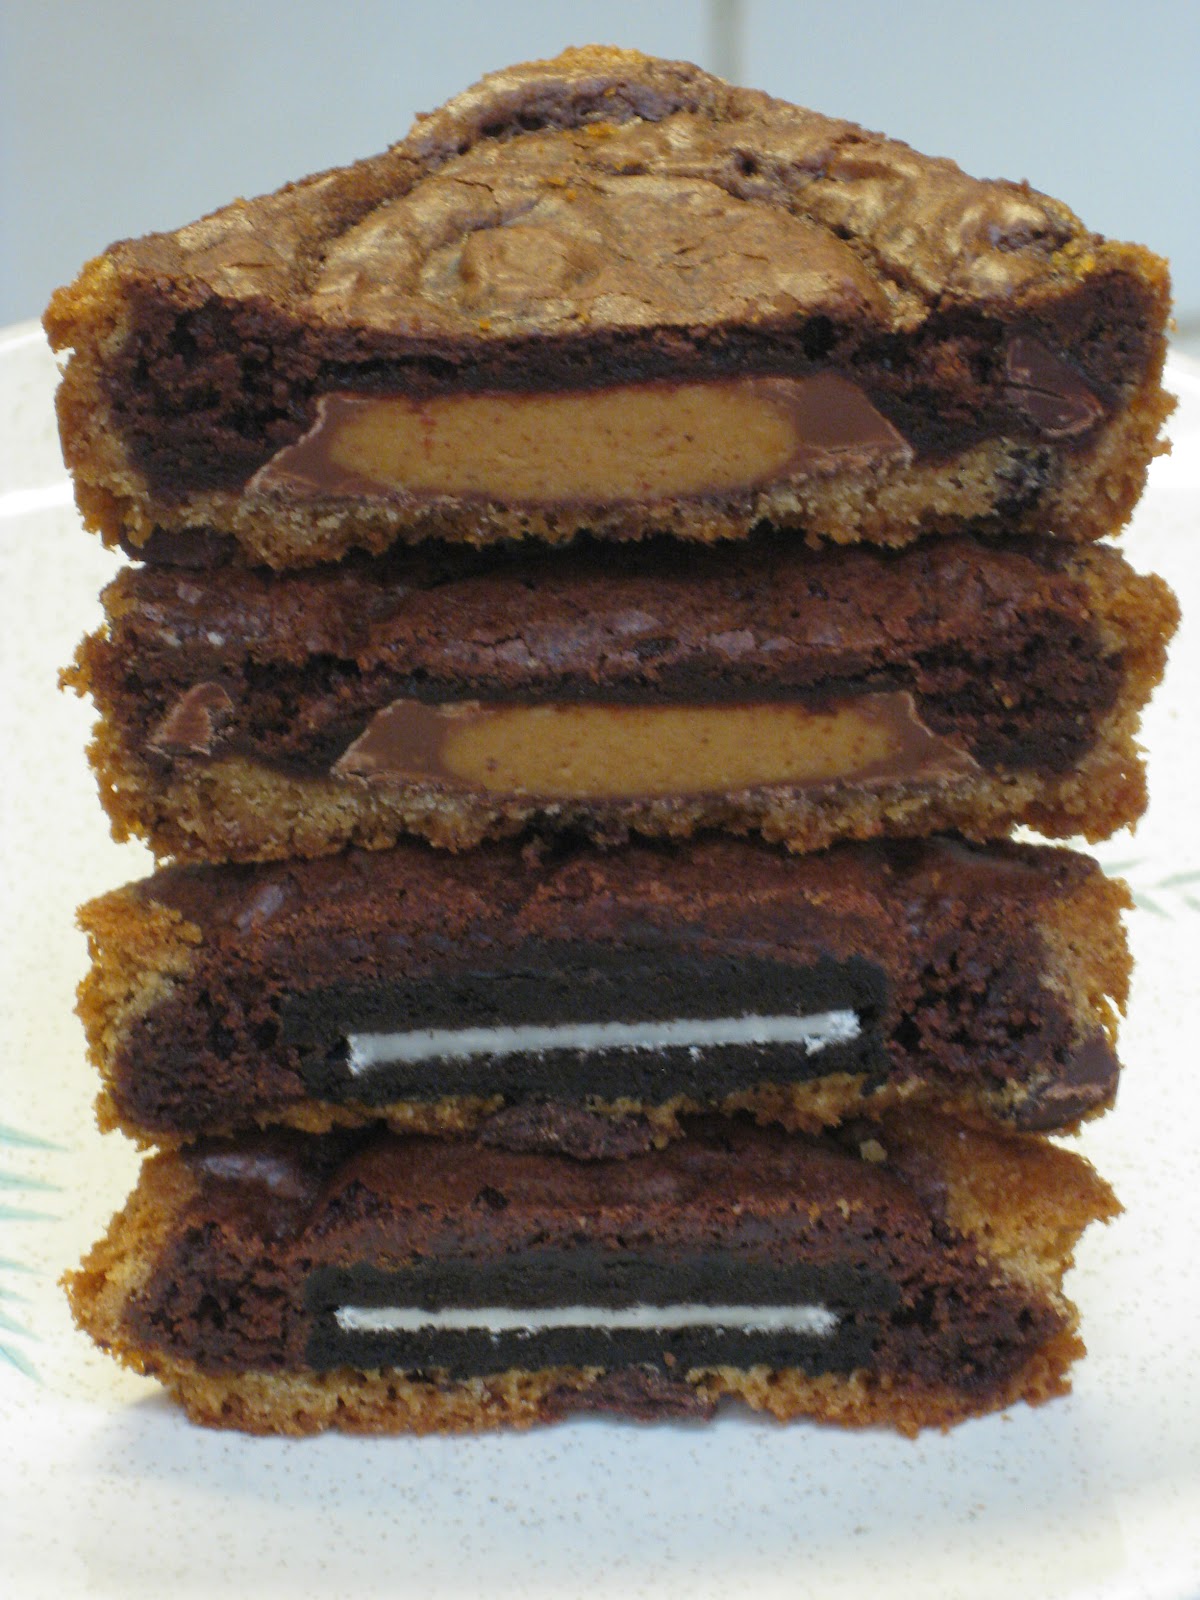
I did what she had suggested in her blog and used Reese's Peanut Butter cups and Oreos for the filling.

 
I used 1 tablespoon of cookie dough which was one square of the premade cookie dough.

I used about 1 1/2 tablespoons of brownie batter.  I used a cookie scoop for this and it work out well for measuring and neatness.  I just barely had enough brownie mix for 2 pans or 24 cookies.  Had to use my Pampered Chef rubber spatula to scrap the last bit of batter for the last cookie.  It was close.

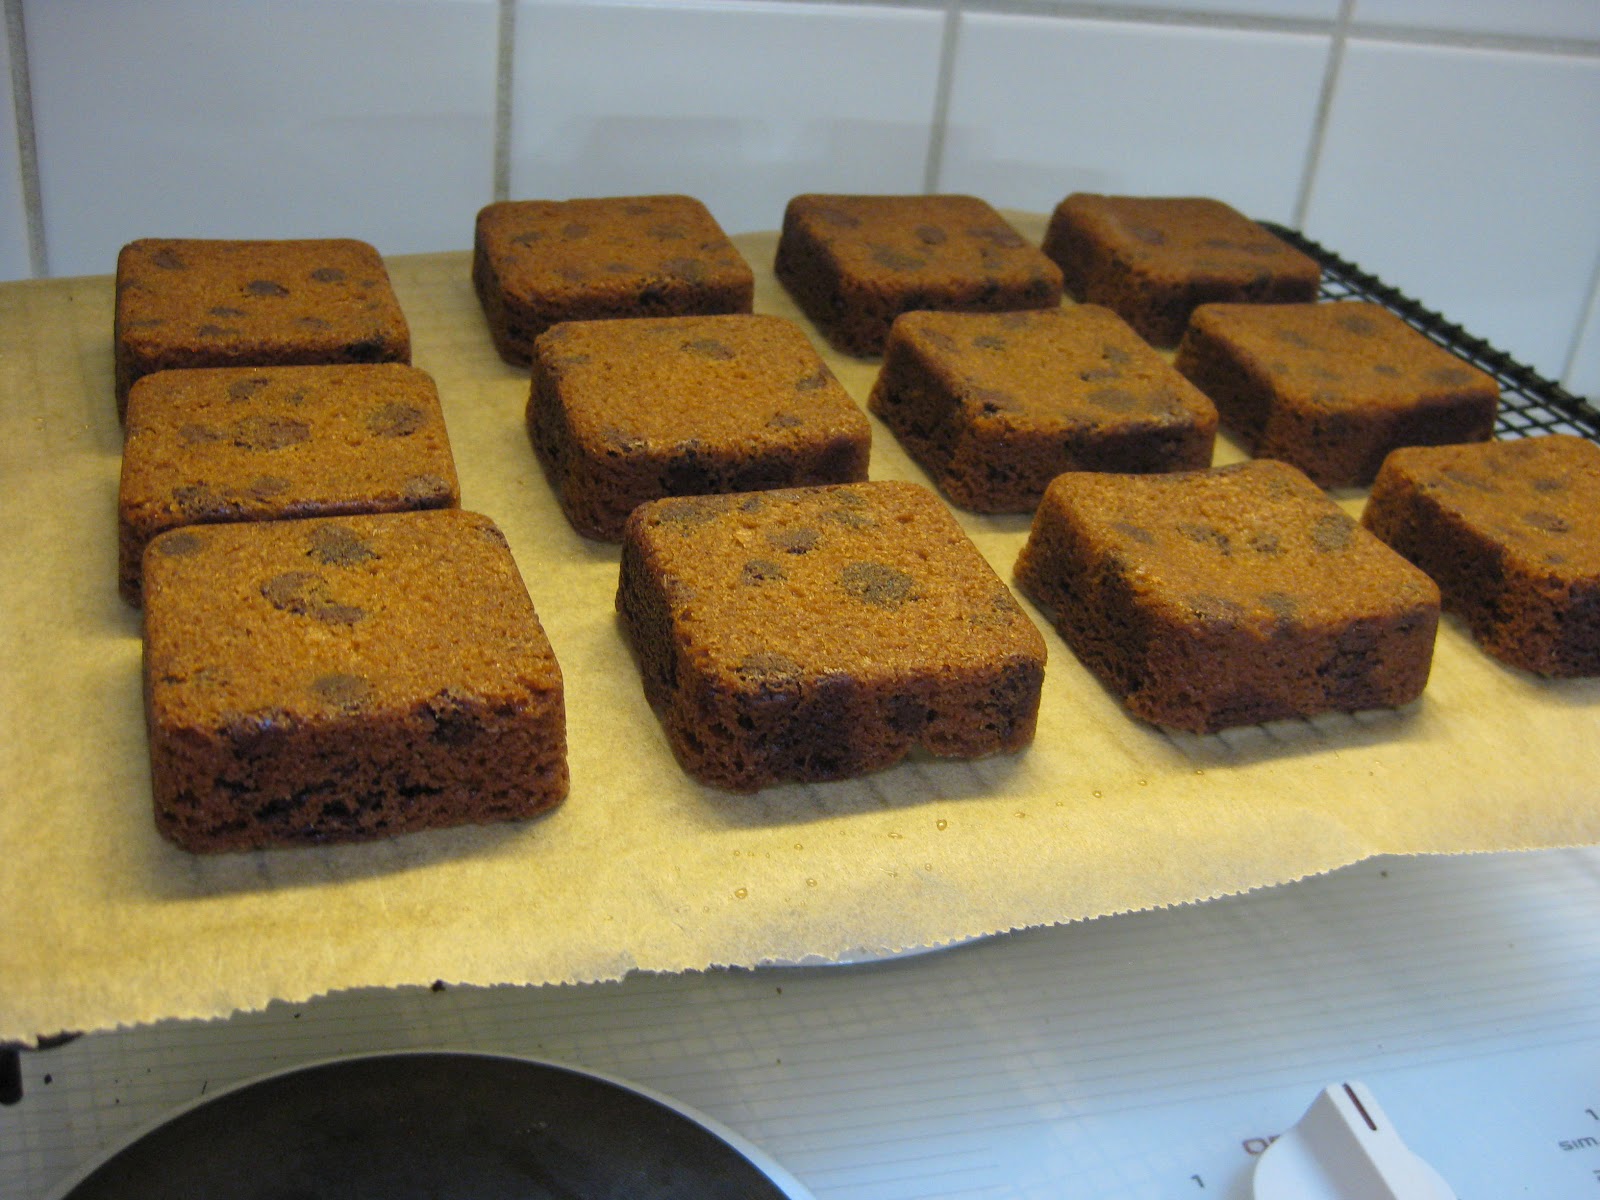
I baked them at 325 degrees F with my convection oven for 18 minutes.  As you can see they came out perfectly the way I wanted.  No over flowing.  Nice neat delectable squares.
 
To make 24 cookie/brownies I used:
1 package Nestle Chocolate Chip Cookie Dough Bar
1 package Ghirardelli Double Chocolate Brownie Mix
12 (15g ea.) Reese's Peanut Butter Cups (not small snack size, but not regular)
12 regular filling Oreos

Moment of truth... they fell right out of pan. No sticking at all.  I'm thinking that maybe some people used a different pan.  The Pampered Chef one truly was nonstick.

 Either side looks impressive.  You could serve them either way.
I couldn't remember which ones were peanut butter cup and which were Oreo.  My husband said he could tell by looking at the tops of them.  He said that each filling had their own unique circular footprint.  LOL leave it to a man to get all technical about cookies and their filling.
Thanks to him and his technical thinking I was able to save myself one of each cookie before they were all gone.  Most were eaten before they had cooled.
I wanted to wait til mine were cool so I could see how the filling held up during baking.  I was afraid the peanut butter cups melted together and the Oreo filling melted away.  As you can see they held up great.
Not only did they look great they tasted great.  Our favorite was the peanut butter cup cookie brownie.  But don't get me wrong the Oreo cookie brownies did not go to waste.  It's been less than 24 hours and I have 4 out of 24 left to bring to my cousin and her family.  Good thing I bagged them up early or I probably wouldn't have had them.

Wednesday, May 2, 2012

Oreo Cookies on a Stick

I saw Oreos dipped in chocolate on a stick online and thought how cute, yummy and quick would these be for a bake sale at my daughter's school.  I did a search online.  Read up on how others had made theirs and decided on a couple things.  I didn't want to open each cookie up to put the stick in as a couple sites recommended.  I definitely wanted to use popsicle sticks verses the white candy sticks.  I just loved the look of the stick.  I also loved the look of the white candy coating with sprinkles.

What I needed... 2 packs of "Double Stuf" Oreos, one pack of popsicle sticks, 2 - 12oz. bags of white candy coating (I used Guittard), and sprinkles of your choice.  This made 52 Oreo pops.  I think I had about 6 broken cookies that didn't even make it to the stick process.  DH was glad to put them out of their misery.

For each cookie I measured how far I wanted the stick to go in then I pushed it into the cookie.

I found that probably half the cookies were either already broken or I broke them pushing the stick in.  Not sure which.  Holding the cookie semi firmly with fingers and thumb of one hand as I pushed the stick in kept everything together.  I found the frosting held the cookies together nicely and that the broken cookie wasn't a factor in the finished product. 


Only one time out of 52 did a piece of the broken cookie dropped off into the chocolate. I just picked it up and stuck it back in place. No problem.


52 cookies on a stick waiting to be coated.

 After a few air pockets emerging on the sides I decided it was better to coat the center of the cookies before coating the top and the bottom.  I never dipped the cookies as I didn't think they stay on the stick and the broken cookies might fall a part.

  I used a spoon to drizzle candy coating around the center frosting section
 Then I spooned some coating on the top and using a "saucing a pizza like swirl" I spread the coating.  Flipped the cookie over and repeated.  I then gently tapped side of stick with my finger to loosen up the excess candy coating to drip back into the double boiler.  Good thing I did this as with 2 - 12oz bags of candy coating I was JUST able to coat 52 cookies.  Would not have been able to do 53.
 I put all the cookies on wax paper.  It was a little too warm in my kitchen yesterday for them to set in a timely manner. I ended up putting them in the freezer for 15 minutes.
 Since these were something quick I wanted to try for a bake sale I didn't bother standing them up to set and putting sprinkles on both sides.  For a party at my house I might do that.
 They just turned out adorable.
 They looked like something one would have to buy.
 I know they will be a hit at the bake sale.
 I could have sent them over like this, but I was feeling very crafty yesterday.
And I wrapped each one in a little bag.

Sunday, October 23, 2011

Frosted Pumpkin Mini Donuts


There was a yard sale 2 doors down from my house Saturday.  Couldn't resist taking a peek.  I found a mini donut pan for 50 cents.  Thought it was cute and would be fun to play with.  I figured there would be mini donut recipes online.  Or I could use a regular cake mix.  Or my favorite fall recipe for Frosted Pumpkin Cookies came to mind.

My search on the internet didn't yield anything exciting, so thought I'd go with my Frosted Pumpkin cookie recipe.  I thought it would work well for a couple of reasons.  One I really love maple frosted donuts.  Two the recipe makes a cake like cookie perfect for a mini donut.  Recipe is below, but see my notes below the recipe for instructions on how to use the recipe with a mini donut pan.

Frosted Pumpkin Cookies

1/2 cup butter, softened
1 1/2 cup brown sugar, firmly
2 Large Eggs
1 cup cooked, mashed pumpkin
1/2 tsp Lemon extract
1/2 tsp Vanilla extract
2 1/2 cup all purpose Flour
1 T baking powder
1/2 tsp salt
2 tsp pumpkin pie spice
1 cup pecans, chopped

Frosting
1/4 cup butter, softened
2 1/4 cup powdered sugar, sifted
2 T milk
3/4 tsp maple extract

Cream butter; gradually add brown sugar, beating well at medium speed of an electric mixer. Add eggs, one at a time, beating after each addition. Stir in pumpkin and flavorings.

Combine flour, baking powder, salt, and pumpkin pie spice. Gradually add to creamed mixture, mixing well. Stir in pecans.

Drop dough by teaspoonfuls 2 inches apart onto greased cookie sheets. Bake at 375 F for 12 minutes. Cool on wire racks. Frost with Maple Frosting. Makes 7 1/2 dozen.

Frosting: Cream butter; gradually add 1 cup powdered sugar, beating well at medium speed of an electric mixer. Add remaining sugar alternately with milk, beating until smooth enough to spread. Add maple extract, and beat well.


Lynne's notes for mini pumpkin donuts: I put a couple of tablespoons of milk in dough to loosen it up a little. I spooned pumpkin dough into a ziploc sandwich baggie (if you don't have a ziploc use a twist tie to close bag and keep dough in bag) and then cut the tip off enough to let the pecans pass and fill mini dough pan at least 1/2 way with one pass. This technique filled pan easily, quickly and without a mess. I buttered mini donut pan feared the donuts would stick. Last batch I sprayed pan with Pam and that worked great too.


I baked mini donuts for 8 minutes. The 10 minutes for cookies was too long for the donuts.  I made a 1/2 batch and it made 36 adorable and delicious mini donuts. 


For the frosting I added a tad more milk to loosen it up a little too. Don't want it too runny. Dipped top of donuts in frosting and placed on plate.


Make sure you set a few aside for yourself as your family will inhale them before you get back to the kitchen.

P.S. I make my own Pumpkin Pie Spice.  I always have all the spices to make it and I don't use it often enough to have a whole jar of it alone.

3 tsp ground cinnamon
1 tsp ground ginger
1 tsp ground allspice
1 tsp ground nutmeg

Stir to blend.  Makes 2 tablespoons of pumpkin pie spice.

Saturday, June 11, 2011

Outdoor Movies and Chocolate Dipped Strawberries

My brother started outdoor movies in the 90's at Halloween.  He'd affix a bed sheet tautly to his porch for a screen.  Then project a movie of his choosing in the Halloween genre, but G rated since is nephew and niece were quite young.  "Mad Monster Party" was a particular favorite (see movie trailer at link.)  After "Trick or Treating" we go back to his house for a movie. We'd bring our sleeping bags and lay down on the lawn.  We'd mostly watched the movie, but sometimes we'd fall asleep.  It was all apart of the fun.

Ever year at the same time I was having a Halloween party for my friends.  Kids were not invited for many years, basically because they were too young to stay up that late.  They would go to Grandma's and Grandpa's.

Then the year came when the kids wanted a Halloween party of their own.  So, I combined the parties and invited all my adult friends to bring their kids.  I asked my brother that year if he'd do an outdoor movie at my house.  We showed "The Nightmare Before Christmas."  It was a big hit.

We had many outdoor Halloween parties, but one year my daughter asked if we could do an outdoor movie for her birthday.  Having a summer birthday it sounded like a great idea.  That's how the summer outdoor movies started.


We tape a white sheet on to our garage door and project the movie on to it.  We make quite a night of it.  I have 2 portable fire pits we roll out for warmth and s'mores.  I pop lots of popcorn.  We encourage everyone to bring a chair if they like.  Definitely bring a blanket and pillow.  As with tradition someone always falls asleep during the movie.  The blanket serves to keep one warm, because even though it's summer we get what's called "The Delta Breeze" in the evening.  It takes a 100 degree summer day and brings the temps down to the 60's nearly ever night.


This years snacks included chocolate dipped strawberries and I made some peanut butter cookies with the chocolate kisses.

Chocolate dipped strawberries are simple and yet very impressive looking.  Not to mention they just taste great. 

What I do is I put 2 cups of chocolate chips in double boiler.  A double boiler consists of a pot that holds hot water and a bowl or another pot that sits securely over this pot. The top bowl or pot holds the chocolate while it melts over the indirect heat.  Do not boil the water.  Keep the heat low.  Also don't let the water touch the bottom of double boiler.  The chocolate chips melt fast like this.  Once melted I turn off the heat.

While the chocolate chips are melting I wash the strawberries.  Making sure to get the dried blossom off the end and little seed flakes off of the strawberries.  Don't know what else to call them, but if you rub each strawberry gentle under water you'll have a clean strawberry ready for dipping.  I like to find large strawberries, but no one has ever turned their nose up at a small chocolate dipped strawberry.  Make sure strawberries are completely dry.  Since I don't make a lot of them I dry each strawberry individually.  You don't want water in the chocolate or it will cause the chocolate to seize and makes it completely unmanageable.

I cover a cookie sheet with wax paper and begin dipping.  I pinch all the stem leaves in my fingers to use as sort of a dipping handle and to keep them out of the chocolate.  Then I lay the strawberry on it's side in the chocolate (probably a 45 degree angle) and twist it until strawberry is coated to my liking.  I've found you don't need the chocolate really close to the stem as it's a part of the strawberry one does not eat.  Lay dipped strawberry on wax paper.  When all are dipped I find a flat spot (or make one) in my fridge to let the chocolate set.  If you don't get the sheet flat all the dipped strawberries will slide off cookie sheet if there is no rim or slide to rim and set in one giant aggravating clump.  So, flat is the key.  Once set peel off wax paper and put on serving dish.

Sunday, March 27, 2011

Return of the Giant Cookie

Thursday was yet another rainy day.  Probably the 14th one in a row and I'm not exaggerating.  I'm not going to complain as we need the snow in the mountains even if it means the valley gets water logged.  After school on Thursday as we fought the wind and the rain to get home my daughter says I really want some chocolate.  We were already home by then and I wasn't about to go back out in the storm.  I checked around in my pantry and I had all the makings for chocolate chip cookies.  My daughter asked if I could make a giant cookie.  I said yes.  Then I checked my pantry again and I had a bag of Special Dark Hershey Kisses.  I love making my giant cookies with chocolate chips that look to scale of a cookie that big.  Plus the chocolate would impress 3 teenagers with cabin fever.

I used 1 1/2 times my favorite chocolate chip cookie recipe, one bag of Special Dark Kisses unwrapped (instead of chocolate chips), one round piece of baking parchment (trimmed to round shape) and my round Pampered Chef baking stone.  Use baking parchment I think it's what keeps cookie dough from running off of stone as per my Pampered Chef consultant.  Smooth cookie dough out to within 1 inch of edge NO CLOSER.

Ultimate Chocolate Chip Cookies


3/4 stick Crisco® Baking Sticks Butter Flavor All-Vegetable Shortening
1 1/4 cups firmly packed light brown sugar
2 tablespoons milk
1 tablespoon vanilla extract
1 large egg
1 3/4 cups All Purpose Flour
1 teaspoon salt
3/4 teaspoon baking soda
1 cup semi-sweet chocolate chips
1 cup coarsely chopped pecans (optional)

PREPARATION DIRECTIONS:

1. HEAT oven to 375ºF.

2. COMBINE shortening, brown sugar, milk and vanilla in large bowl. Beat at medium speed of electric mixer until well blended. Beat in egg. Combine flour, salt and baking soda. Mix into shortening mixture until just blended. Stir in chocolate chips and nuts.

3. DROP by rounded measuring tablespoonfuls 3 inches apart onto ungreased baking sheet.

4. BAKE 8 to 10 minutes for chewy cookies, or 11 to 13 minutes for crisp cookies. Cool 2 minutes on baking sheet on a cooling rack. Remove cookies to rack to cool completely.

TIP* If nuts are omitted, add an additional 1/2 cup semi-sweet chocolate chips.

Sunday, January 30, 2011

One Bowl Chocolate Brownie Cookies


It was movie night last night and I wanted to try something new and something fast.  This fit the bill.

One Bowl Chocolate Brownie Cookies

6 ounces semisweet or bittersweet chocolate
4 ounces unsweetened chocolate
6 tablespoons butter or margarine
1 1/4 cups sugar
3 eggs
2 teaspoons vanilla
1 cup flour
1 teaspoon baking powder
1/4 teaspoon salt
2 cups chopped toasted walnuts -- optional


Oven to 325 degrees.

Microwave chocolates and butter in a large microwave bowl on HIGH, 1 1/2-2 minutes or until chocolate is almost melted, stirring halfway through heating time. Stir until chocolate is completely melted and smooth.

Stir sugar into chocolate until blended. Mix in eggs and vanilla. Stir in flour, baking powder and salt. Stir in nuts.

Drop by rounded tablespoons, 1 1/2" apart onto ungreased cookie sheets.

Bake 12 minutes or until set. Do Not Overbake. Cool 5 minutes. Remove from cookie sheets. Cool completely on wire racks.

Store in airtight container.

Lynne's Note:  I used toasted pecans, because I prefer them.  I only had semisweet chocolate and cut the sugar back by 2 tablespoons.  They were still very sweet.  I baked my cookies on a Silpat.  When I let the cookies cool the 5 minutes stated in recipe they were glued to the Silpat.  When I let the cookies cool for about 1 minute or so I could get the cookies off in one piece and looking nice.  Great quick recipe when you want something sweet now.

Cookie on far right is the one I waited only a minute or 2 for the cookie to firm up enough that I could take it off the Silpat.  The bottom of cookie stayed intacted for a nice cookie cookie.  The cookies on the left I waited the 5 minutes and they were stuck.  Cookie at the bottom left is an example of most of that batch looked like.  I would scrap what was left of the cookie and squish it to the bottom.  Don't get me wrong nobody poo pooed the cookies whatever shape they were in.  They were very good.