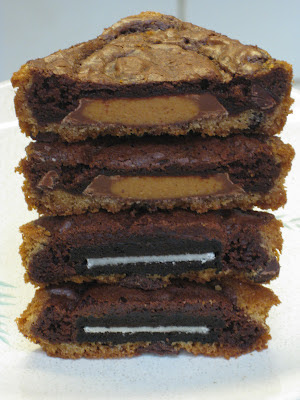
I don't know what to call these except wonderful! Maybe they should have sinful in the title some where too. My daughter said, "We should call them "The Hybrid", because they are an offspring of two different baked goods." I said, "I like it!"
I got the idea to make them from a picture I saw on Pinterest. I clicked on it and it took me to
"My Pampered Kitchen Adventures" Blog. Click on the link and slowly scroll down and you'll see the picture that intrigued me. I knew some day I was going to make these wonderful looking brownie/cookie concoctions. I didn't know it was a Pampered Chef pan at the time. I had only seen the picture on Pinterest. While placing an order with my Pampered Chef lady I saw this pan and ordered one. Not knowing I had the
exact pan I needed. The pan has been hanging out in my kitchen for a few months. I come a across it every now and then and think I need to make that recipe. Then life gets in the way.
Well, my daughter was off on one of her surfing trips with friends and I like to send them with a bag of treats even though they aren't kids anymore. I love surprising them with something yummy and they love getting something yummy. I decided to make these squares of deliciousness. Only problem I didn't really have time to make cookie dough or brownie batter. I decided to follow the blog's recipe exactly and use store bought
cookie dough and a
brownie mix.
Thanks to the blog's pictures I could see that she had over filled the pan and I didn't want mine to turn out like that. I wanted neat little squares. I wanted to try and use the smallest amount of cookie and brownie to cover the filling. Some people had suggested that their cookie/brownies got stuck in the pan. I decided to spray my pan with Pam and hope mine didn't get stuck. I felt pretty good that they wouldn't, because cookie dough is the bottom layer and it just doesn't stick. I wasn't going to put in too much brownie mix, so it wouldn't overflow making the whole thing stick. Plus I sprayed my nonstick pan really good with nonstick cooking spray.
I did what she had suggested in her blog and used Reese's Peanut Butter cups and Oreos for the filling.
I used 1 tablespoon of cookie dough which was one square of the premade cookie dough.
I used about 1 1/2 tablespoons of brownie batter. I used a cookie scoop for this and it work out well for measuring and neatness. I just barely had enough brownie mix for 2 pans or 24 cookies. Had to use my Pampered Chef rubber spatula to scrap the last bit of batter for the last cookie. It was close.
I baked them at 325 degrees F with my convection oven for 18 minutes. As you can see they came out perfectly the way I wanted. No over flowing. Nice neat delectable squares.
To make 24 cookie/brownies I used:
1 package Nestle Chocolate Chip Cookie Dough Bar
1 package Ghirardelli Double Chocolate Brownie Mix
12 (15g ea.) Reese's Peanut Butter Cups (not small snack size, but not regular)
12 regular filling Oreos
Moment of truth... they fell right out of pan. No sticking at all. I'm thinking that maybe some people used a different pan. The Pampered Chef one truly was nonstick.
Either side looks impressive. You could serve them either way.
I couldn't remember which ones were peanut butter cup and which were Oreo. My husband said he could tell by looking at the tops of them. He said that each filling had their own unique circular footprint. LOL leave it to a man to get all technical about cookies and their filling.
Thanks to him and his technical thinking I was able to save myself one of each cookie before they were all gone. Most were eaten before they had cooled.
I wanted to wait til mine were cool so I could see how the filling held up during baking. I was afraid the peanut butter cups melted together and the Oreo filling melted away. As you can see they held up great.
Not only did they look great they tasted great. Our favorite was the peanut butter cup cookie brownie. But don't get me wrong the Oreo cookie brownies did not go to waste. It's been less than 24 hours and I have 4 out of 24 left to bring to my cousin and her family. Good thing I bagged them up early or I probably wouldn't have had them.


