Monday, September 19, 2011

Kit Kat... I think I love you!

My son declared his love for Kit Kats many years ago.  So, I thought it would be a perfect theme for a young man's birthday treat.  Last year was the very popular Kit Kat cake.  Earlier this year I hadn't even begun to think of what was next until my son and I saw this blog entry.  My son marveled at it, but I thought in my head, "THAT'S IT! That is what I'm making my son for his next birthday."  This was back in March.  I bookmarked the entry and sent the link to my email.  September rolled around and when I went back to double check how it was made the links didn't work.  Minor panic set in, but it was still very clear in my mind what I needed and how I needed to do it.  With some more web searching I did find the entry and photos moved to another person's blog.


So, to begin with I knew exactly where I'd buy my supplies.  I went to Cost Plus World Market.  I knew they'd have the wafer cookies I needed.  They also have many chocolate choices.  I decided upon Ghirardelli chips.  They came in milk chocolate in a 2 pound bag.  I bought 4 - 2 pound bags of chocolate and 4 bags of the Quadratini Chocolate Wafer Cookies.

I also owned the perfect pan.  It had belonged to my mother-in-law.  I've kept it for over 25 years thinking I'd bake bread in it maybe an angel food cake.  Never thinking what it would finally end up using it for.

Once my son was off to school I had 6 hours to work my magic.  I had thrown the pan in the dish washer the night before.  I had also worked on the lettering the night before.  I printed out the Kit Kat logo twice in the size I wanted it.  One I used as a pattern to cut out craft foam I had in the craft room.  I wasn't really sure if this sort of thing should be used with food, but since I wasn't going to be stewing it and its an item kids craft with odds were in my favor there wouldn't be any potential poisoning.  You'll have to decide that for yourself.


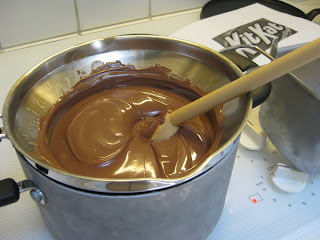
I began melting the chocolate on very low heat.  The water in a double boiler is not supposed to boil.


As the chocolate chips melted I stacked the cookies in the pan to get an idea of whether or not I had bought enough.


I then decided to stick my foam letters down with a little chocolate.  I wasn't really sure how to stick them down.  I was afraid they might float.  I also didn't want chocolate to ooze beneath them if I used some sort of bulky tape adhesive.  Notice how the letters are in the pan.  One can not read them.  This is so you CAN read them on the finished product.  To keep me from messing this one up I pictured it as a mirror image of the original print.  Having the extra printed out copy of the logo was a big help in keeping me on track with this very important detail.

I poured about a 1 inch layer of melted chocolate in the bottom of pan.  I was just winging it.  I wanted it to be sturdy, but leave room for the cookie center.

After chocolate had set (in the refrigerator) I began placing the cookies.
Here's where I made my only mini mistake.  I didn't know it until the end when the Kit Kat was sliced.  The chocolate encased the cookies on the outside holding them in place, but the cookies on the inside were glued to nothing and fell out of the slice.  Don't get me wrong NO ONE said, "I don't want a slice of the Kit Kat, because the middle cookies are falling out."  It was more of an aesthetic thing for me the perfectionist.  If there is a next time glue cookies together with a dot of chocolate.  I'd melt chocolate in a baggie in the microwave.  Cut small corner of baggie.  Use the hole to squeeze dot of chocolate on cookies as placed in pan.  This would go the fastest.  I say dot of chocolate, because this is so rich and chocolately a lot more chocolate in the middle isn't necessary.  Plus you don't want a lot of chocolate getting in the way of the cookies.
Next step was to melt more and more chocolate until the cookies are covered.  It took 7 pounds of chocolate to cover mine.

My biggest fear was that I wouldn't be able to get the Kit Kat out of the pan.  My next fear would be the letters floated up and mixed in with the chocolate.  I waited until my son went to school the next day and figured I'd have about 5 hours to figure out how to get it out of the pan if it didn't pop right out.  I also figured I'd have time to carve a Kit Kat on the top if my lettering didn't work out.  Thank my luck stars it popped right out.  I was so excited to see it out of the pan.  The lettering right where I wanted it.

I used an x-acto knife to lightly carve the edges of the craft foam to make sure they didn't lift away any of the chocolate as I peeled them out.  Except for a few bubbles they came out perfectly and easily.  I was so pleased it came out so well.


I wondered if my son would have remembered our looking at the Kit Kat online and would be expecting this.  He had forgotten all about it.  He was speechless!

Saturday when my son had his friends over I asked him to come get me when he unveiled the Kit Kat.  Of course I had gone to run a quick errand when they decided they needed a treat.  I came home to Kit Kat mayhem.


So, I just went and asked them, "So, what did you guys think about the Kit Kat?"  Like my son their eyes all got as wide as saucers as they excitedly told me how cool it was.  The one young lady at the party exclaim, "You're my hero!  Kit Kats are my favorite."

Monday, September 12, 2011

OMGosh was this Delicious! Pastitsio Lynne's Way

I went to the Greek Festival a few Friday's ago at the urging of a friend who was once married to a Greek.  She has 3 sons who love Greek food and she still loves it to this day.  We went when admission was free and had lunch there.  They had a full on cafeteria style Greek food set up.  I ordered Pastitsio, but I was torn between that and Moussaka.  I love eggplant.

Pastitsio as I had remembered it was like a lasagna with a cheese sauce on top.  The Pastitsio at the Greek Festival was good, but I remember making it at home a few years ago and decided I would do it again.  I bought what they called uncut macaroni at the Greek Festival.  They had used that noodle in their dish and I thought it was really fun.  It was a tube as long as spaghetti.  I've looked around at the grocery stores near me and that might have been the last bag I'll see until the next Greek Festival.  Or you can order some at this link.  I bought this Misko brand at the Greek festival and all the writing on the package is in Greek.  It made me chuckle when I went to read the instructions on how to cook it.  "It's all Greek to me."

I didn't get a picture of my Pastitsio, but this blog has a great picture of their version of Pastitsio.

I looked for Pastitsio recipes online and found 3 that sort of fit the bill.  I liked a little bit of each of them and decided I'd do just the parts I liked and make my own vision of Pastitsio.  One noticeable thing I changed was the amount of cinnamon.  2 recipes called for 1 tsp and the other recipe called for 1 tablespoon.  I recalled from the last time I made Pastitsio and the reason I haven't made it since was the cinnamon over powered the whole dish.  I didn't want to leave it out entirely, but I wanted to greatly reduce it.

Another thing the recipes said it would feed 8 people.  This made a giant Pastitsio that would feed at least 12 people.  Maybe the Greeks have bigger appetites.

Pastitsio Lynne's Way

3 T Olive Oil
1 1/2 pound ground beef
1 onion, finely chopped
3 cloves minced garlic
1 (28 oz) can crushed tomatoes in puree
1/4 tsp cinnamon
1 tsp dried oregano
1/2 tsp dried thyme
pinch cayenne pepper
Salt and freshly ground black pepper
3 cups grated Pecorino Romano
1 pound uncut macaroni (can use macaroni, ziti, penne, small shells)

Bechamel:
4 T unsalted butter
4 T all-purpose flour
1 1/2 cups milk
1/2 cup heavy cream
1/4 tsp freshly ground nutmeg
salt and freshly ground pepper
1 1/2 cups Parmesan
2 large eggs, beaten
2/3 cup Greek style yogurt or sour cream

For sauce, heat the olive oil over medium-high heat in large pan.  Add the onion and saute for 5 minutes.  Add the beef and saute over medium heat for 8 to 10 minutes, until it's no longer pink.  Drain off any excess liquid.  Add garlic, cinnamon, oregano, thyme and cayenne and continue cooking over medium heat for 5 minutes.  Add the crushed tomatoes, salt, pepper and simmer stirring occasionally for 35 minutes.  Set aside.

Meanwhile, cook the pasta in a large pot of boiling water until al dente.  Don't over-cook because the pasta will later be baked.  Drain and set aside.

For the Bechamel, melt butter in medium sauce pan.  Add flour and cook over medium heat.  Pour cold milk and cream into the butter and flour mixture whisking constantly.  Continue cooking and stirring over medium heat for 5-7 minutes until smooth and thick.  Add the nutmeg, salt and pepper.  Stir in 3/4 cup of Parmesan cheese, 1/2 cup of tomato and meat sauce, and allow to cool for 10 minutes.  Stir in the eggs and yogurt and set aside.

Preheat the over to 350 degrees F.

Place a 1/4 of grated Romano cheese in a 11 X 14 inch pan and then layer with 1/3 of the pasta.  Continue until both ingredients are used up.  Spread on the meat sauce.  Pour the Bechamel on top of the meat sauce.  Sprinkle with remaining 3/4 cup of Parmesan cheese.  Bake for 1 hour until golden brown and bubbly.  Set aside for 10 minutes and serve hot.
Serves 12.

Friday, September 2, 2011

If You Knit Or Crochet Join Ravelry

It's free and I really have a good time over there talking to other fiber lovers.  Someone I discoved over there is PlanetJune.  She makes the most adorable amigurumi.  What is that exactly?  The word is derived from a combination of the Japanese words ami, meaning crocheted or knitted, and nuigurumi, meaning stuffed doll.

My first experience with June was her Groundhog pattern.  I don't know why, but he was so adorable I had to make him.  I've made several of her patterns since.  She did a free pattern a while back that looked fun.  It was the apple.  This pattern like the groundhog was so adorable that when I'd show my finished product to friends and family they'd want it!  I had to keep a close eye on them or my daughter would snitch them.  In fact where are they?  Have I let my guard down?

Well, now June has a new pear pattern and has created a "Fruit-A-Long" on Raveley.  The "Fruit-A-Long" refers to making her fruits along with other people.  Sharing your experience of making them and then photos of your finished crocheted fruit.

I'm hoping you'll join Ravelry, look up PlanetJune and join in the fun.