Showing posts with label Beef. Show all posts

Saturday, July 21, 2018

The Best Roast Beef Hash Recipe

I don't want to lose this recipe. It's very hard to find. It's so good that having it in multiple places helps me to not misplace it.

I got the recipe from the Parade section of the Sunday paper in 2007. There's no eggs over easy, no celery, no leftover gravy, precooked potatoes, no extraneous fresh herbs. What makes this delicious for me is the red and green peppers; hence, it's name Confetti Roast Beef Hash.

Sometimes I like to use a purple onion to really bump up the color.

Confetti Roast Beef Hash
2 pounds russet potatoes, peeled and cut into 1/4-inch dice
1/2 pound leftover roast beef, cut into 1/4-inch dice
1/4 pound thick-sliced bacon, cut into 1/4-inch dice
1 onion, chopped
1 each red and green bell pepper, seeded and cut into 1/4-inch dice
1/4 teaspoon nutmeg
Salt and pepper, to taste

 1. Cook the potatoes in boiling salted water until tender, 8 minutes. Drain and place in a large bowl with the beef.

 2. Cook the bacon over medium heat to render the fat, 5 minutes. Add the onion and bell peppers; cook, stirring, for 5 minutes. Remove with a slotted spoon and add to the potatoes and roast beef, along with the nutmeg, salt, and pepper. Toss.

 3. Discard all but 2 tablespoons of the fat from the skillet, then spread the hash mixture evenly in the skillet and weight it down with something heavy, like a smaller skillet. Cook over medium-high heat until golden brown on the bottom, about 5 minutes. Turn the hash over with a spatula and cook until golden brown, 5 to 7 minutes. Spoon the hash onto six plates. Serve immediately.

Saturday, May 31, 2014

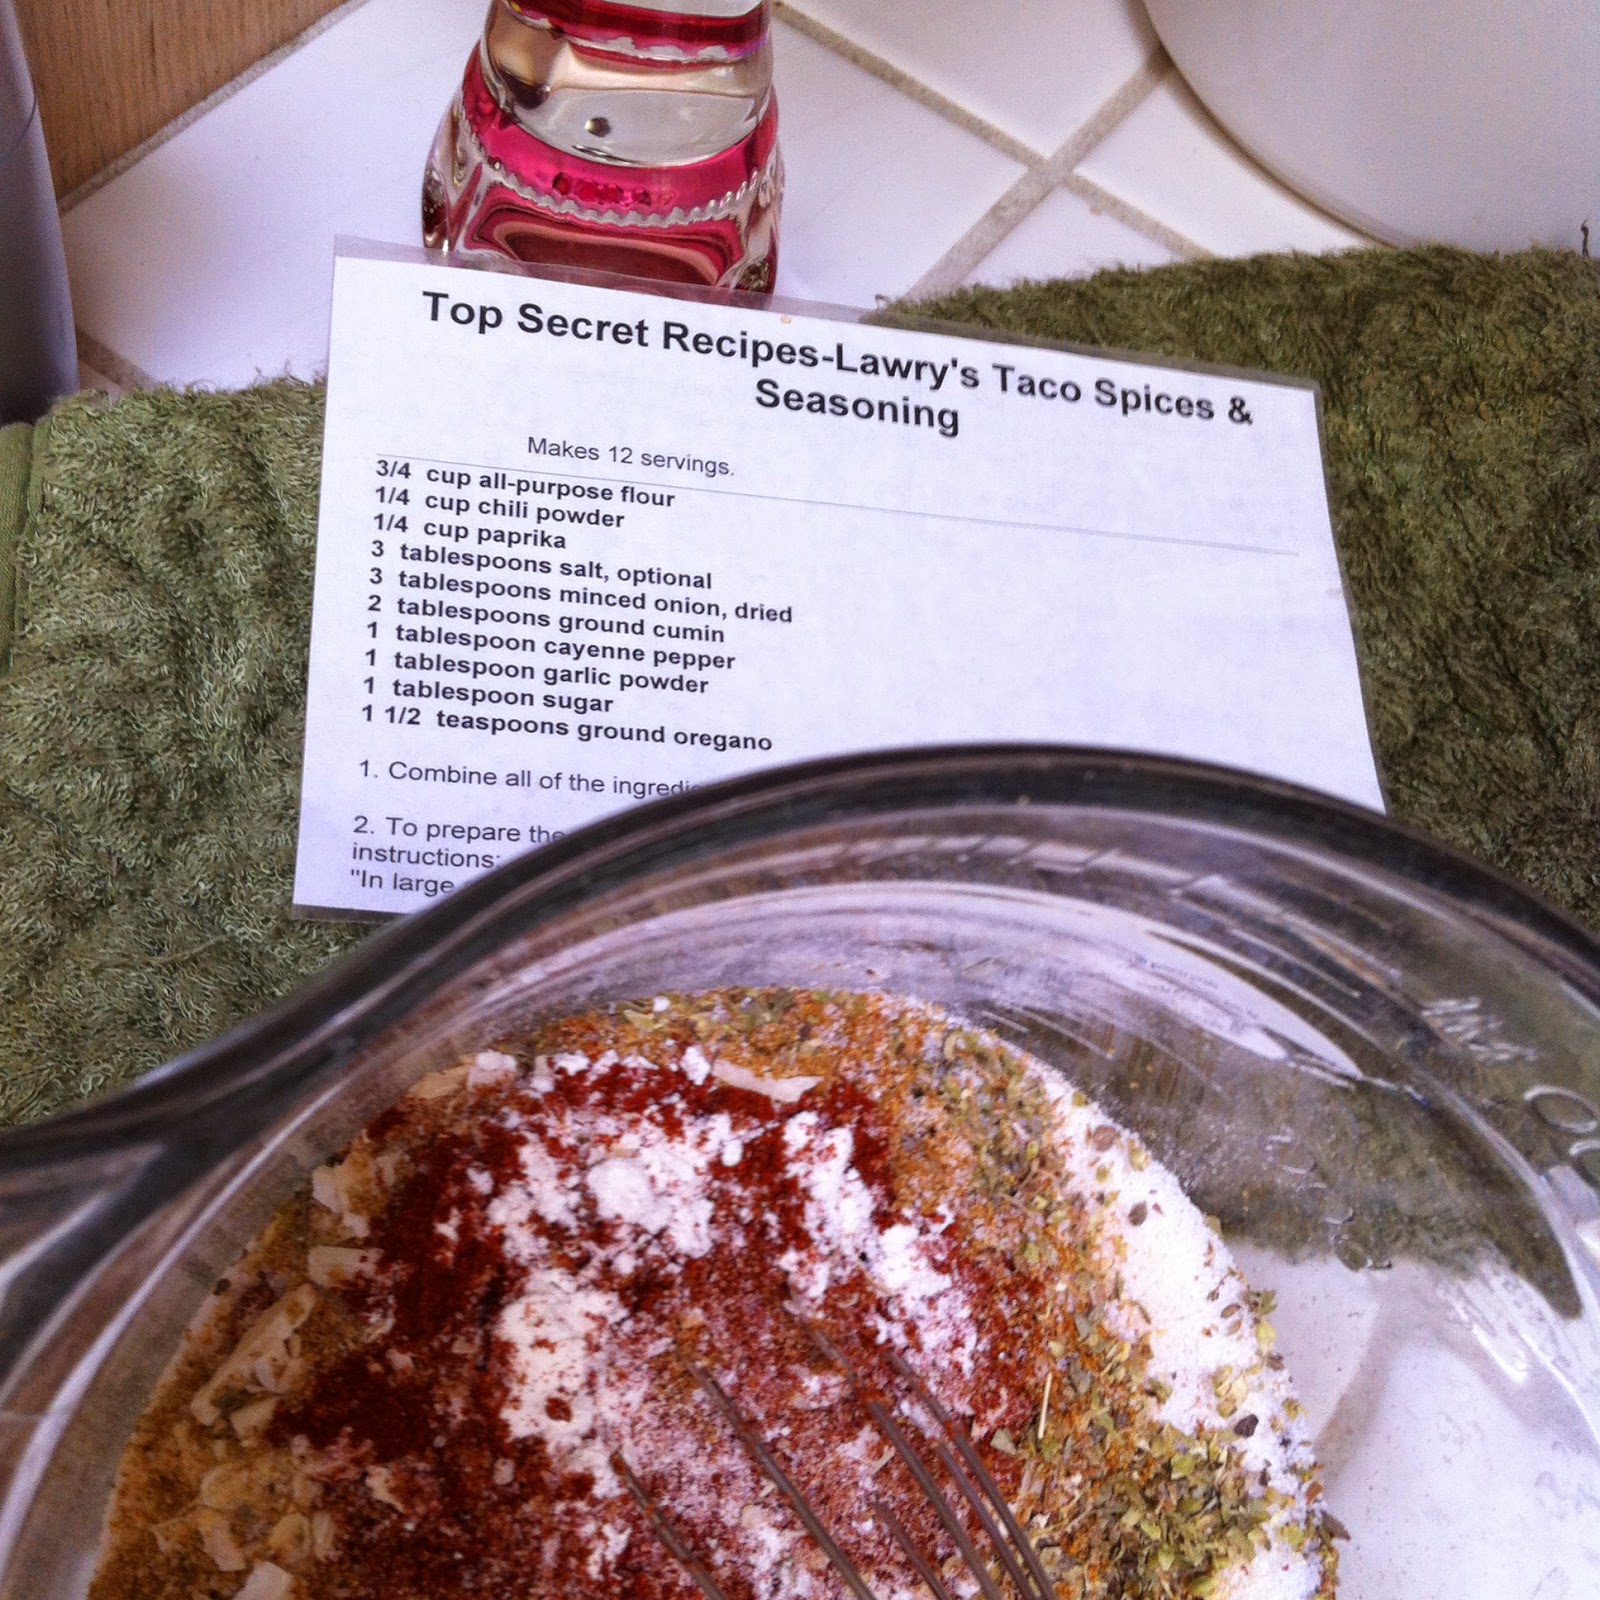
Homemade Taco Seasoning... Why?

I originally started making my own taco seasoning, because store bought was too salty for me.  I quit added salt when I was 17.  I went to live with my Grandmother while going to college and she couldn't have salt due to high blood pressure.  She was miserable and complaining about bland food quite a bit at the time.  So, I thought this is my future.  I may as well get use to no added salt now, so when I'm 60 I won't be so miserable.  Fortunately for me I grew up with very little added salt, so making the switch wasn't too hard.  Taking my added salt to nil really made store bought foods like canned soups and seasonings like taco seasoning seem overwhelmingly salty.

I tried a few recipes and found I liked this recipe and started making my own.  For some reason I really like the minced onion in this one.

In addition to less salt I found I could also control the heat of the seasoning too.  I tend to be a bit of a pansy with spicy foods.  When I make this seasoning I found out adding no salt is really terrible tasting.  It is really hard to recover from it too when seasoning the finished taco meat.  On the other hand lessening the spiciness isn't a problem.  Anyone wanting more heat just sprinkles on some Tapatio on their taco or burrito.

I like to mix up a batch and keep it in the pantry.  First time I made it many years ago I put it in a sandwich bag and stuck it in the pantry.  Next day when I opened my pantry I was slapped up side the head with a strong smell of taco seasoning and shelf liner.  One would think it was delightful.  No, it was overwhelming and not something I wanted to smell every time I entered the pantry.  I placed the bag of taco seasoning in a jar with a lid and that keeps all the wonderful smell inside the jar.  Now that I think about it why don't I just put the seasoning in a mason jar and save myself a baggie?  Proof one can learn something new every day.

So, when making this experiment with the salt and the heat.  I like to use 1 T of salt and 1 tsp of cayenne pepper for my perfect taco seasoning.  I also never have ground oregano so I rub about 1 tablespoon of the oregano leaves between my hands to break it up a little for the 1 1/2 tsp of ground oregano.

3/4 cups all purpose flour
1/4 cup chili powder
1/4 cup paprika
3 tablespoons salt, optional
3 tablespoons dried minced onions
2 tablespoons ground cumin
1 tablespoon ground cayenne pepper
1 tablespoon garlic powder
1 tablespoon sugar
1 1/2 teaspoons ground oregano

Mix together and store in a tightly cover container.  Makes about 12 servings of mix.  Add 3 T of mix to 1 pound of browned ground beef along with 3/4 cup of water.  Bring to a boil; reduce heat to low, and cook, uncovered, 7 to 10 minutes, stirring occasionally.  Use seasoned meat in tacos, burritos, nachos, taco salads.  Enjoy.

Monday, September 12, 2011

OMGosh was this Delicious! Pastitsio Lynne's Way

I went to the Greek Festival a few Friday's ago at the urging of a friend who was once married to a Greek.  She has 3 sons who love Greek food and she still loves it to this day.  We went when admission was free and had lunch there.  They had a full on cafeteria style Greek food set up.  I ordered Pastitsio, but I was torn between that and Moussaka.  I love eggplant.

Pastitsio as I had remembered it was like a lasagna with a cheese sauce on top.  The Pastitsio at the Greek Festival was good, but I remember making it at home a few years ago and decided I would do it again.  I bought what they called uncut macaroni at the Greek Festival.  They had used that noodle in their dish and I thought it was really fun.  It was a tube as long as spaghetti.  I've looked around at the grocery stores near me and that might have been the last bag I'll see until the next Greek Festival.  Or you can order some at this link.  I bought this Misko brand at the Greek festival and all the writing on the package is in Greek.  It made me chuckle when I went to read the instructions on how to cook it.  "It's all Greek to me."

I didn't get a picture of my Pastitsio, but this blog has a great picture of their version of Pastitsio.

I looked for Pastitsio recipes online and found 3 that sort of fit the bill.  I liked a little bit of each of them and decided I'd do just the parts I liked and make my own vision of Pastitsio.  One noticeable thing I changed was the amount of cinnamon.  2 recipes called for 1 tsp and the other recipe called for 1 tablespoon.  I recalled from the last time I made Pastitsio and the reason I haven't made it since was the cinnamon over powered the whole dish.  I didn't want to leave it out entirely, but I wanted to greatly reduce it.

Another thing the recipes said it would feed 8 people.  This made a giant Pastitsio that would feed at least 12 people.  Maybe the Greeks have bigger appetites.

Pastitsio Lynne's Way

3 T Olive Oil
1 1/2 pound ground beef
1 onion, finely chopped
3 cloves minced garlic
1 (28 oz) can crushed tomatoes in puree
1/4 tsp cinnamon
1 tsp dried oregano
1/2 tsp dried thyme
pinch cayenne pepper
Salt and freshly ground black pepper
3 cups grated Pecorino Romano
1 pound uncut macaroni (can use macaroni, ziti, penne, small shells)

Bechamel:
4 T unsalted butter
4 T all-purpose flour
1 1/2 cups milk
1/2 cup heavy cream
1/4 tsp freshly ground nutmeg
salt and freshly ground pepper
1 1/2 cups Parmesan
2 large eggs, beaten
2/3 cup Greek style yogurt or sour cream

For sauce, heat the olive oil over medium-high heat in large pan.  Add the onion and saute for 5 minutes.  Add the beef and saute over medium heat for 8 to 10 minutes, until it's no longer pink.  Drain off any excess liquid.  Add garlic, cinnamon, oregano, thyme and cayenne and continue cooking over medium heat for 5 minutes.  Add the crushed tomatoes, salt, pepper and simmer stirring occasionally for 35 minutes.  Set aside.

Meanwhile, cook the pasta in a large pot of boiling water until al dente.  Don't over-cook because the pasta will later be baked.  Drain and set aside.

For the Bechamel, melt butter in medium sauce pan.  Add flour and cook over medium heat.  Pour cold milk and cream into the butter and flour mixture whisking constantly.  Continue cooking and stirring over medium heat for 5-7 minutes until smooth and thick.  Add the nutmeg, salt and pepper.  Stir in 3/4 cup of Parmesan cheese, 1/2 cup of tomato and meat sauce, and allow to cool for 10 minutes.  Stir in the eggs and yogurt and set aside.

Preheat the over to 350 degrees F.

Place a 1/4 of grated Romano cheese in a 11 X 14 inch pan and then layer with 1/3 of the pasta.  Continue until both ingredients are used up.  Spread on the meat sauce.  Pour the Bechamel on top of the meat sauce.  Sprinkle with remaining 3/4 cup of Parmesan cheese.  Bake for 1 hour until golden brown and bubbly.  Set aside for 10 minutes and serve hot.
Serves 12.

Monday, August 1, 2011

The Mythical Guy Fieri's Costco Tri-Tip

OK it's not exactly mythical, but the fact that I can't find it again or prove that I've had one has moved it to that category.  Last month BEFORE my surgery I bought a marinated tri-tip at Costco with Guy Fieri's name on it.  They were sampling it and it was delicious.  We promptly threw it on the grill that night.  It was SO good and so small the 3 of us ate all of it that night. It was my husband, daughter and I here that night.  So, my son teases that there was some form of mass hallucinations going on regarding the delicious tri-tip we all won't stop talking about.

I figured I fix his butt and buy another one.  Can't find it.  Not only that I have no idea what it was called other than Guy Fieri's name was on it.  Who is Guy Fieri?  He's a Food Network Star.  Literally!  He won the first season of "The Next Food Network Star" and has been quite a character on that network ever since.

So, I did a search online thinking I could come up with a name of this mythical tri-tip and I really couldn't find too much.  I did find his recipe for Santa Marie Tri-Tip that kind of seems like it might be what we had.  One thing I remember vividly was in was marinating in an orange liquid in the package.  This recipe calls for an orange oil called Achiote Oil.


Last night I had gathered all my ingredients.  Achiote seeds from the Mexican grocery store, lots of garlic and cracked black pepper.  I made the Achiote Oil per Guy's instructions on the recipe.  That was easy.  Then followed the recipe.
Right now the tri-tip is in the refrigerator for it's 24 hour sit.  Quite honestly all the pepper and salt have me a bit frighten that it will not be edible, but I can't see Guy steering me wrong.

Update:  Very tasty.  Nothing like Costco tri-tip.  Very salty, but not too peppery.  If I were to do this again I'd cut the salt back.

Friday, July 29, 2011

Vultures, Teenagers, Oh My!

DH had some leftover ground beef and didn't know what to do with it.  I said to bag it up and I'd make an easy dinner of it the next night.  My thought was my all time favorite "Hamburger Beanie Wienie."  That's what my mom always called it even though it never involved wienies or a hot dogs... whatever one wants to call it.  The recipe came from an odd source and had no name.

I was 7 when my mother told me I'd be staying with the neighbors for about half an hour as she'd be late getting home that day.  "GREAT!" is what I thought sarcastically as I didn't like Clifford our neighbor's son.  He was 1 year older than me and 100 times more naughty.  He bullied my brother and I on our own swing set.  He ran around my parents new car dragging an untwisted wire hanger leaving about 10 circular scratches on the paint.  And on the day I was to STAY at their hose for 1/2 an hour he escorted me into their house like I was a prisoner of war.  Thank goodness he didn't have any rope.

One very good thing came of this day though was his mother had made the most delicious after school snack.  I recognized ground beef.  I recognized beans, but other than that I had no idea what was in it.  I just knew it was delicious.  When my mother came to rescue me... err...pick me up I told her about this wonderful concoction and that she needed to get the recipe.  As all good mother's she did go ask for the recipe.  Ground beef and Pork N' Beans.  That was the recipe.  I'm not sure why, but that combo makes the most delicious taste sensation.

So, last night after a long day at the lake I made this easy and delicious recipe.  My daughter and her 4 friends were going to stay and visit a while after their day at the lake.  On the way home these teenagers had their own money and were so hungry they asked if I'd drive them by our local Mexican Restaurant for take out.  Since I hadn't planned dinner for 5 hungry teens I thought this was a good idea.  They ate and went on with their business and I made dinner for my husband and me.  DH wasn't going to be home for a couple hours, but this recipe is better warmed up later.

As I was leaving the kitchen to go take my shower one of my daughter's friends came into the kitchen.  I knew she hadn't purchased as dinner and she said she was looking for food.  I pointed at the skillet and told her she was welcome to have some the dinner I had fixed.  She had one bite and declared it delicious and prepared herself a bowl.  I went to take a shower.  Then I blew my hair dry.  Then I watched a show on the TV in my room and I jokingly said, "I better go put DH's dinner in the fridge as I don't want to leave it unattended in a house full of teenagers."  When I saw the nearly empty skillet my eyes did that thing that cartoon characters eyes do when they are surprised by what they see.
I think the sound "arooga" trumpeted in the background.

When I offered the dinner to my daughter's friend it was because I knew she ate like a bird.  Now the old joke of "She eats like a bird... yeah a vulture" was coming to mind.  This recipe is really good stuff.  I checked the clock and quickly texted my husband that he needed to pick himself up something for dinner on the way home.  He called and asked what happened and we both had a good laugh.  So, seriously folks don't leave food unattended when you have teenagers in your house.  It's no joke!

Here's the recipe.  Over the years we've tweaked it just a little, but it's basically the same.

Hamburger Beanie Wienie
1 med onion, diced
1 pound ground beef
1 28 ounce can Pork N' Beans
garlic powder and season salt to taste

Saute' onion until soft.  Add ground beef.  Cook and break up the ground beef until cooked all the way through.  No pink left.  Add can of Pork N' Beans making sure to scrap all the sauce out of can.  Season with garlic powder and season salt to taste.

Tuesday, May 17, 2011

Beef and Bean Enchiladas Will Make You Cry

DH found this recipe I don't know where about 20 years ago.  It's been a family favorite ever since.

Last night my DD asked to have enchiladas for dinner.  I said sure if you make them.  They really aren't hard to make, but they take a bit of time.

First thing one does with this recipe is chop the onions.

Using the Pampered Chef Food Chopper doesn't seem to help with the onion fumes.  It does chop the onions quickly; therefore, less crying.
OK maybe she was hamming it up a little and she was cracking me up.  It brought back to my attention what can one do to avoid the onion fumes.  I wear contacts and I have zero problem with chopping onions.  Nobody else in my family needs eye correction and has that option.

My mother said that she felt her glasses helped protect her.  I've also read to lean back.  Don't lean over the onions while chopping.  Years ago I even bought the onion goggles for my kids.  What my kids have told me is none of the above have helped them.  They just chop, power through the crying and get on to the cooking.

DD likes to skip the frying of tortillas to save time.  In the end the enchiladas turn out about the same like a casserole.


Beef and Bean Enchiladas

1 1/2 lbs. ground beef
1 med. onion, chopped
1 (1 lb.) can refried beans
1 tsp. salt
1/8 tsp. garlic powder
1/3 c. taco sauce
1 c. ripe olives, quartered
2 (10 oz.) cans enchilada sauce
Salad oil for frying tortillas
12 corn tortillas
3 c. shredded cheddar cheese

Crumble ground beef in a frying pan; add onions. Saute until meat is browned and onions are tender. Drain off excess fat. Stir in beans, salt, garlic powder, taco sauce and olives; heat until bubbly. Heat enchilada sauce; pour half the sauce into an ungreased shallow 3 quart baking dish.

In small frying pan, heat salad oil about 1/4" deep. Dip tortillas, individually, in hot oil to soften; drain quickly. Place 1/3 cup beef filling on each tortilla; roll to enclose filling. Place seam side down in baking dish. Pour remaining enchilada sauce over the filled tortillas. Cover with shredded cheese. Bake, uncovered 350 degrees for 20 to 25 minutes.

To Serve: Top each serving with sour cream combined with green chili salsa. May garnish with sliced, pitted ripe olives. Serves 4 to 6.

Lynne's note: I have microwaved and warmed tortillas up in the enchilada sauce in an effort to skip frying. Both methods lead to fragile tortillas and frustration. I stick with frying. How often does one have enchiladas? I have found frying them all up and draining them allows them to cool off. Enough so as to not burn my fingers and they stay flexible enough to roll.

Stop it DD you're making me laugh.

Wednesday, November 3, 2010

Bean Pot Pizza

How many of you out there own a Home & Garden Bean Pot?  They were sold at Home & Garden shows, which were run like Pampered Chef or Avon shows.  It was so adorable I had to have one.  Ten years ago!  Now what to do with it other than collect dust.  I decided to drag mine out and try this recipe.  It could be cooked in something other than a Bean Pot.  Maybe 2 layers in a 9X13 inch pan with aluminum foil.  It's that good you'd want to make it.


Home & Garden Party Bean Pot Pizza

By Nancy Westbay, OH

1 1/2 pounds ground beef
1 small onion, chopped
16 oz. box rotini, (spiral pasta), cooked
1 small can mushrooms stems and pieces, drained
32 oz. pizza sauce
16 oz. mozzarella shredded cheese
3 oz. pkg. pepperoni
Brown ground beef and onion together.  Drain and combine with cooked macaroni, mushrooms and pizza sauce.
Prepare your Home & Garden Party Bean Pot with a vegetable oil spray and then layer  ingredients as follows:
Approximately 1/3 of the rotini and beef mixture, then 1/3 of the sliced pepperoni, and 1/3 of the shredded cheese.  Repeat the layers, ending with a layer of pepperoni and reserving about 1/3 of the shredded cheese.
Cover with lid, place in oven and bake for 1 hour at 325 degrees F.

After baking, remove from oven and top with reserved cheese.  Cover with lid and let it set until the cheese is melted.

Serve with salad and garlic bread.

Lynne's note:  After it was baked I couldn't add the cheese AND replace the lid.  The rotini had puffed up to the very top of Bean Pot.  So, I threw on the cheese and bake in the oven for 15 minutes.  Worked out great.  Everyone raved about it and said it should be made again.  I fed 6 people generously and had enough leftover for 2 lunchs today.

Monday, October 11, 2010

Western Meal-in-One

Monthly meal plan going well.  Only one hitch I was looking at the September calendar when I made my plan, so I wasn't so far behind when I made it.  Added 2 more meals to the plan to compensate for flipping calendar to new month 3 days late. :)

This meal was already on the list though.  I got this meal from my MIL's stash of recipes.  I don't know where she got it.  My MIL passed away about 6 months into our marriage.  My FIL has passed 6 month before we got married.  There was DH and I newlyweds living 2 1/2 hours away in an apartment and a whole house and garage of stuff to tend too.  I felt so bad for my husband.  He's an only child and I know he was feeling like an orphan at this time.

He put me in charge of sorting the kitchen.  I got to thinking what reminds one of home?  Mom's favorite recipes!  Only problem was DH and his family ate breakfast, lunch and dinner out everyday most of his childhood.  I know weird huh?  Or maybe I think that, because my family ate every meal in.  The amount of times I ate "out" as I child I can count on one hand. 

DMIL did start cooking when she retired, which had only been one year.  She also cooked sporadically over the years for special occasions.  It was a challenge finding recipes.  I found a few written recipes and then I looked through the few cookbooks she had for pages with splatters on them.  Always the sign of a recipe that's been used and could potentially be a good one.

Some where in there I found "Western Meal-in-One."  DH remembered liking it.  I made it a few times as newlyweds and we liked it.  The recipe however had languished in my recipe box for years when I came across it again on meal planning night.  DH and I wondered why hadn't this been made in years?  It was in a category called "Casseroles" in the recipe box.  There were only 2 recipes in that catagory and neither had been made in years.  I mostly look under the type of meat or style of cooking when needing a recipe.  So, this recipe has been refiled under "Beef."  It was very good and hope to make it again in the near future.

Western Meal-in-One


(The colors in this dish were just beautiful.)

1 pound ground beef
1 tablespoon vegetable oil
1 clove garlic, minced
1 teaspoon salt
1 large onion, finely chopped
1 green bell pepper, finely chopped
1 teaspoon chili powder
1 can petite cut tomatoes, undrained
1 can kidney beans, undrained
3/4 cup uncooked rice
1/4 cup chopped ripe olives
3/4 cup grated Cheddar cheese

Brown ground meat in oil until crumbly. Add garlic, salt, onion, green bell pepper and chili powder. Saute for 5 minutes or until vegetables are limp. Mix in tomatoes, kidney beans and rice. Add a little water or tomato juice as needed. Turn into a greased 2-quart casserole. Bake, covered, at 350 degrees F for 45 minutes.

Sprinkle with olives and cheese. Uncover. Bake 15 minutes longer or until cheese is melted.

Serves 8.

Lynne's note:  I worried there wouldn't be enough liquid to soften the rice, but there was.
(Recipe calls for 2 quart dish.  I only had a 3 quart (9X13).  It worked fine.)


Check out Mommy's Kitchen for some more delicious recipes.

Mommy’s Kitchen

Sunday, October 3, 2010

Menu Planning not a new concept

I've tried menu planning in the past and it never works out too well for me.  Seems like a great idea.  I think I've figured out that I've been too rigid in my planning.  I found a gal who does a list of meals mainly dinner and they eat from the list.  She has a blog called "Mommy's Kitchen."  The meals are not assigned a day.  That was our problem.  We may not be in the mood for or have the time for say Chicken and Dumplings the assigned meal of the day.  Something so simple and yet it made me smack my forehead "Of course" when I was reading her description on how she creates her menu plan.

This way I can pick a meal that suits the schedule and mood of the family.  She also made the suggestion to not to plan all 30 or 31 days of the month.  (yes I know one month has 28 or 29 days)  She plans for 25 of 30 days.  Things happen.  Sometimes we eat out.  Sometimes not everyone is home.  Life of having teenagers and a husband who refs soccer.  One can grab something simple maybe even eat some leftovers rather than cook a whole meal.  Since I was getting a late start on the month I planned 17 meals for the remaining 25 days.

I quizzed the family as to what they'd like to eat this month.  I also looked through my recipes and recipes I'd like to try.  Made a list and an accompanying grocery list.

Here's what we're having...

*Uncle Brad's Spaghetti Sauce, Green Salad and garlic bread
Baked Chicken, mashed potatoes
*Chicken and Dumplings
Pot Roast
Paninis and Roasted Red Pepper Tomato Soup
Cheeseburger Casserole (Paula Deen Recipe)
*Hamhocks and Chili Beans, cornbread
*Beef & Bean Enchiladas
*Hot & Sour Soup, *BBQ Pork Buns
Nachos
Make your own pizza night
Marinated Tritip, Cheddar Potato Slices
Chicken Caesar Salad
Hot dogs and Hot Links, Coleslaw, Ranch Beans
*Western Meal In One
*Mexican Lasagna
*Fideo

Once I started making my grocery list I realized I may need to adjust the menu next month for more variety.  We are going to eat an awful lot of ground beef and cheddar cheese this month.  Not that anyone will complain, but just doesn't sound too healthy on a regular basis.  Since the family was excited to be a part of the process I decided to leave it as is this month.

As we were making suggestions we came up with a couple ideas one was the power of one veto.  I suggested one veto, because we'd never get enough recipes if we let everyone veto anything they didn't like.  I also said one can not veto the same meal 2 months in a row.  Some meals most of us love and would hate to never have them again.

This month DS vetoed Chinese Simmered Chicken (one of my personal favorites that hurt), DH vetoed One Dish Chicken and Rice, DD vetoed Curry (DH's favorite).  My son jokingly suggested BBQed poodle ribs and I vetoed it.  Not that I didn't think they wouldn't be delicious and tender, but my DPoodle looked up at me with adoring eyes and I vetoed for her. :)

Here is one of this month's recipes.  Been a family favorite for years.

Beef and Bean Enchiladas

1 1/2 lbs. ground beef
1 med. onion, chopped
1 (1 lb.) can refried beans
1 tsp. salt
1/8 tsp. garlic powder
1/3 c. taco sauce
1 c. ripe olives, quartered
2 (10 oz.) cans enchilada sauce
Salad oil for frying tortillas
12 corn tortillas
3 c. shredded cheddar cheese

Crumble ground beef in a frying pan; add onions. Saute until meat is browned and onions are tender. Drain off excess fat. Stir in beans, salt, garlic powder, taco sauce and olives; heat until bubbly. Heat enchilada sauce; pour half the sauce into an ungreased shallow 3 quart baking dish.

In small frying pan, heat salad oil about 1/4" deep. Dip tortillas, individually, in hot oil to soften; drain quickly. Place 1/3 cup beef filling on each tortilla; roll to enclose filling. Place seam side down in baking dish. Pour remaining enchilada sauce over the filled tortillas. Cover with shredded cheese. Bake, uncovered 350 degrees for 20 to 25 minutes.

To Serve: Top each serving with sour cream combined with green chili salsa. May garnish with sliced, pitted ripe olives. Serves 4 to 6.

Lynne's note:  I have microwaved and warmed tortillas up in the enchilada sauce in an effort to skip frying.  Both methods lead to fragile tortillas and frustration.  I stick with frying.  How often does one have enchiladas?  I have found frying them all up and draining them allows them to cool off.  Enough so as to not burn my fingers and they stay flexible enough to roll.

Thursday, August 26, 2010

Curry The Easy Way


I don't like curry.  I don't like the spice.  I don't like the smell or the taste unless in very small quantities.  If a recipe I have calls for it I won't avoid it, but I'll reduce the amount by about 1/3 to 1/4 depending on my mood.  I've been known to just add a pinch.

That's why many years ago about 25 I was very surprised to find I really liked this curry dish.  A friend had made it and I just happened to come over for a visit.  She invited me to sit down for dinner.  I hate curry, but when someone is being so thoughtful and generous I put my juvenile dislikes aside and partake.  (That's how I ended up eating a tuna fish sandwich 30 years ago.  Another story.)

I took the smallest serving I could without hurting any one's feelings.  Then I began to eat.  To my great surprise it was good.  Even great!  It didn't taste like the curry spice I loathe and despise.  It tasted like it had a pinch of curry the way I would season a curry dish.  It was savory and delicious.  I asked my friend for the recipe and she snickered and held up the Vermont Curry Sauce Mix box.  "I just buy it at the grocery store and follow the directions," she said.  Even better how easy can that be.  I knew some day I'd make some at my house.  Being single at the time though I really didn't do any big cooking.

Shortly there after I got a boyfriend.  Wanting to impress him I invited him over for dinner and made the curry dish.  He loved it and to this day he's my husband.  Not saying making this dish will get you a husband, but hey it wouldn't hurt to try.


Over the years I've found it hard to find Vermont Curry.  The grocery stores generally carry the S&B Golden Curry Sauce Mix.  It's not bad and I'd even say it's good, BUT the Vermont Curry is REALLY GOOD.  I have found if you can find an Asian Market you will find Vermont Curry Sauce Mix.  The Asian market I frequent is about 30 miles away.  I really need to find one closer.  So, I actually don't go much.  I'll buy 3 sauce mixes and sometimes I'll just throw them in the freezer if I'm not going to use them any time soon.

It's simple to make the recipe it is right on the back of the box. 

1 box Vermont Curry Sauce Mix
Meat (beef or pork) or chicken (1 1/8 lbs.)
4 Medium onions (1 3/4 lbs.)
4 Medium potatoes (1 1/2 lbs.)
1 Medium carrot (1/2 lb.)
5 3/4 cups water

I have made a few small changes over the years.  I always use chicken breast.  That's our favorite, but beef is good too.  Recipe asks for 1 carrot, but we like almost as much carrots as potatoes.  I usually use 4 or more carrots.  Also when it calls for water I put in chicken broth.  I use to make my own chicken broth, but I use canned now days and it's still great.  Also the recipe calls for  4 med. onions.  That seemed like an awful lot from the very beginning.  I've always used 1 to 2 onions.  This recipe is for the 8.8 ounce bar which makes 12 servings.  The package does talk about using half for 6 servings.  The curry bar as I like to call it, because it looks just like a large chocolate bar.  The curry bar in the 8.8 ounce size comes sealed in 2 packages if you only want to use half.  I make the 12 servings, because I have teenagers right now and a hubby who likes to take leftovers for lunch.

The curry bars come in mild, med.hot and hot.  My husband likes hot food.  I do not.  So, I've been pretty cautious using the other bars.  What I've found is that the med. hot isn't that hot.  I haven't had the courage to use it exclusively though.  I buy a mild and a med. hot.  I use half of each for one batch.  I don't find it to be hot at all.   Last night I got a bit braver.  I used half of a mild bar, 1/4 of the med. hot and 1/4 of the hot .  This did give it a slight zing.  I still wouldn't have even called it hot by my standards.  Next time I'll try 1/2 a mild bar and half a hot.  I think though I'll only do a 6 serving batch in case it's too hot and hubby has to eat the whole thing by himself.

Saturday, February 20, 2010

Best Recipe In The World

My mom has been making this recipe for as long as I can remember.  It was written on a recipe card when I asked for it when I moved out.  She didn't know where she had gotten the recipe.  She said probably in the newspaper.  Over the years she'd lose her card or I'd lose mine.  Between the two of us one of us will have it.  I've searched on the internet in desperate times and can't find it, which is pretty unusual.

A few years ago my dad cleaning out the office told my mom she had too many cookbooks and she had to get rid of them.  Well, you know us women and our cookbooks!  I know my mom too and her great love for books in general.  My dad can be quite the dictator.  It's best not to rock the boat some times.  I told her I'd take them home with me and she could look at them at my house.  Also that maybe one book at a time we'd get them back into the house.  Bwahahaha!

Anyhow I was organizing my craft closet where the books were and there was a cookbook called "Savory Stews."  It flipped opened to a dog eared page and low and behold there was "Deviled Short Ribs of Beef!"  I thought I better get it on the internet for all to enjoy and for the next time I lose my recipe card.  From the cookbook "Savory Stews" by Mary Savage.  Copyright 1969.

Deviled Short Ribs of Beef

4 pounds short ribs of beef
1 medium onion, sliced
1 bay leaf
1/2 teaspoon ginger
1 1/2 tablespoons brown sugar
1 heaping teaspoon salt
1/4 teaspoon black pepper
2 tablespoons lemon juice
1/4 cup soy sauce
1/2 cup ketchup
1/2 cup water
More water, if needed
Instant flour

Spread out short ribs in cold stewpot and set pot over moderately high heat. Brown ribs well on all sides and discard the fat. Cover pot and reduce heat to low and cook for an hour and 45 minutes. Pour off all grease again. Add onion and bay leaf and return to low heat. Mix ginger, brown sugar, salt and pepper together in small bowl, stir in lemon juice and then the soy sauce. Add to ribs. Mix ketchup and water together and add to pot. Cover and cook for at least half an hour, until meat is tender. Pour off cooking liquid to measure it and add water to make 2 cups if needed. Discard bay leaf and shake flour into the liquid to make a thin sauce. Return to pot and bring to a light boil, stirring well, and serve immediately. Serves 4 to 6

Lynne's note:  These are the short ribs with bones.  I've tried boneless just doesn't come out right even accounting for bones and using less meat.  Short ribs use to be really cheap and we had this probably once a month at my house when I was growing up.  Now I make it 2 or 3 times during the winter.  I don't use instant flour I use cornstarch to thicken the sauce.  I serve this with rice.  That's how we ate it when I was a kid and it's very good.  Recently, though my parents served this when we were visiting and my dad served it with mashed potatoes.  I didn't like it as well, but everyone else thought it was great.  I asked my dad when did he and mom switch to mashed potatoes from rice.  He said, "We've always served it with mashed potatoes...what are you talking about?!"  He thinks I'm crazy. I think he's senile.  hahaha

Friday, January 29, 2010

Uncle Bradie's Sauce

OK I don't call him Uncle Bradie as I didn't really get acquainted with my Uncle until I was a young adult.  Being an Air Force Brat we just never lived close enough.  Also when I was a kid he was a teenager.  He's only 9 years older than me.  Not much interested in a pesky niece.  He was too busy trying to become a rock star.  The younger nieces and nephews called him Uncle Bradie and I just thought it was funny and cute.  So, when I became aware of his sauce I called it Uncle Bradie's Sauce.

I got acquainted with this sauce when I first met my husband.  He was stationed at a base not far from San Francisco.  On my 2nd date with DH we went to an Aerosmith concert at the Cow Palace.  I drove to San Francisco and stayed the night at my Aunt and Uncle's house.  It was my Aunt who suggested I defrost some of Brad's Spaghetti sauce and have DH over for dinner before the concert.  We both thought the sauce was very good.  Next time I came to San Francisco I asked Uncle Brad for the recipe and he said he didn't have one.  So, I watched him make it and wrote the recipe down myself.  We've been having this sauce ever since.  That's been 25 years.

Uncle Bradie's Spaghetti Sauce

1 pound hamburger
1 pound ground pork
1 pound Italian sausage (taken out of casings)
1 pound sliced mushrooms
1/2 head of garlic, chopped
1 onion med. to large, chopped
6 cans of tomato sauce (8 oz cans or 48 oz)
2 cans of tomato paste (6 oz cans or 12 oz)
1 tsp of white pepper
3 bay leaves (Turkish)
1/2 bottle of Italian seasoning
2 tsp oregano
4 cups of Burgundy wine
1 T sugar

Brown all meats separately and drain the fat off.  Put in large pot.  Add remaining ingredients.  Bring to boil.  Reduce heat and simmer 1 1/2 hours.

First thing I do before starting the sauce is make some Italian seasoning.  This recipe uses a lot.  I usually have all the herbs needed already.  I put 2 tablespoons of each Basil, Marjoram, Oregano, Rosemary and Thyme in a bowl and stir.  You can buy this premade if you don't have the ingredients already at home.
Then I begin browning the meats.  Here I'm browning the ground beef using my handy dandy mix n chop from Pampered Chef.  Makes short work of browning a lot of meat.
I'm browning the sausage IN the casing here for the first time in 20 years.  Uncle Brad had slices of sausage in his.  I thought I'd make it more like his.  I ended up not liking the large chunks of sausage in the sauce.  Reminded me why I do it differently.  So, let this be a lesson to you all take the Italian sausage from it's casing and brown it like you would the ground beef and pork.  The sausage mixes with the flavors of the sauce much better that way.

To save time while I brown all the meats I add the other ingredients to the big pot and start heating it up.  As the meats are browned I put them into the pot.

Here is the ground pork on it's way to being browned and ready for the pot.

Everything is together and simmering.  I usually make a double batch.  This sauce freezes beautifully.  This sauce also makes great lasagna.

Monday, November 16, 2009

Cheeseburger Soup

Some sort of cold/flu bug is running through our family this month. First to succumb was my daughter and I made Chicken Noodle soup for her. Then I got sick. My son made Cranberry Orange muffins for me. Now my son is sick. I knew he wouldn't want any muffins and I know soup isn't his favorite, but soup is SO good when you're not feeling well. I had to ask anyways, "Would you like me to make you some soup?" Thinking he'd say no and the conversation would go to some sort of food I could comfort him with. He said slowly, "Cheeseburger soup?" We both chuckled at the idea. I told him, "You know what, I bet there is a recipe for Cheeseburger Soup on the internet." I did some surfing and sure enough there were several Cheeseburger Soup recipes. I chose the one I thought sounded the best and would appeal to my poor sick son.
Cheeseburger Soup

Prep Time: 20 Minutes
Cook Time: 30 Minutes
Ready In: 50 Minutes
Servings: 8

1/2 pound ground beef
3/4 cup chopped onion
3/4 cup shredded carrots
3/4 cup chopped celery
1 teaspoon dried basil
1 teaspoon dried parsley
4 tablespoons butter
3 cups chicken broth
4 cups cubed potatoes
1/4 cup all-purpose flour
2 cups cubed Cheddar cheese
1 1/2 cups milk
1/4 cup sour cream

In a large pot, melt 1 tablespoon butter or margarine over medium heat: cook and stir vegetables and beef , until beef is brown.

Stir in basil and parsley. Add broth and potatoes. Bring to a boil, then simmer until potatoes are tender, about 10-12 minutes.

Melt the remainder of butter in a separate small pot and stir in flour. Add the milk, stirring until smooth.

Gradually add milk mixture to the soup, stirring constantly. Bring to a boil and reduce heat to simmer for a minute or 2. Remove from heat and stir in cheese. When cheese is melted, add sour cream. Put back on heat if you feel it needs to warm up a little. Do not boil.

Lynne's Notes: What I liked about the recipe was that I had all the ingredients right here at home. I like recipes that don't have fussy ingredients. I didn't add dried parsley. I think it's revolting compared to fresh parsley. Just my own personal problem there. I also didn't add the sour cream to the pot of soup. My husband abhors sour cream. So, the kids and I would stir a teaspoon full into our own bowls. We thought the sour cream really added a lot to the good flavor of the soup. It is a hearty soup. A real stick to your ribs during cold weather kind of soup. The basil doesn't over power the other ingredients and lets the tartness of the cheddar cheese and the sour cream shine threw in their creamy goodness.


After we all ate our soup we all agreed that it was good, but a few changes might be nice if we ever made it again. My son said it needed more meat, more cheese and that serving it in a bread bowl would be nice. I think if I served it in a bread bowl and maybe just sprinkle a little grated cheddar on top he'd love it.

Monday, August 24, 2009

Thai Steak Wrap Delicious

This is one of my favorite healthy recipes that doesn't taste like a healthy recipe. I got it from a cooking show called "Cooking Thin" on the Food Network. It is not on any more, but I really enjoyed it when it was. Fortunately, one can still find all her great recipes on the Food Network site. I still have this delicious recipe that I make from time to time. Recently, I got to thinking I hadn't made it for a long time. With my new workout and weightloss plan I was craving beef. My trainer was suggesting no beef and for 2 weeks I had none and then couldn't stand it any longer. Decided a delicious healthy beef recipe was in order. Don't let the amount of ingredients scare you away. Most of them are for the rub on the meat. It is a very easy recipe.

Thai Steak Wrap
Recipe courtesy Kathleen Daelemans
Serves:
6 to 8 servings
Ingredients
1/2 teaspoon fresh ground black pepper
2 teaspoons coarse salt
1 tablespoon paprika
1/2 teaspoon cumin
1 tablespoon brown sugar
1/2 teaspoon cayenne pepper
1 teaspoon allspice
2 teaspoons grated fresh ginger, plus 1 tablespoon freshly grated ginger
1 tablespoon finely chopped parsley
1 1/4 pound flank steak
1 tablespoon light sesame oil
1 1/2 tablespoons rice wine vinegar
2 tablespoons light soy sauce
1 tablespoon sugar
1 jalapeno, grated
3 scallions, thinly sliced
8 cups Napa cabbage, thinly sliced
1 carrot, shredded
1 cup cilantro, roughly chopped
6 to 8 pita wraps, warmed
Directions
In a plastic re-sealable bag, combine black pepper, salt, paprika, cumin, brown sugar, cayenne pepper, allspice, 2 teaspoons of ginger, and the chopped parsley. Add flank steak and coat evenly. Seal bag and refrigerate for 1 to 12 hours.
(I find it easier to rub the flank steak down BEFORE I put it in the re-sealable bag.)

Grill for 8 to 10 minutes. Allow meat to rest 10 minutes before slicing. (I didn't have time to light up the grill so I dragged out this contraption. It's my rotisserie, but it's also a grill. I've never used it as a grill. After seeing my parents use it as a grill thought I'd try it. It worked great for the flank steak. 10 minutes on each side cooked a perfectly medium rare flank steak.)


In a small non-reactive bowl, combine sesame oil, rice wine vinegar, soy sauce, and sugar. Stir until sugar dissolves. Add remaining ginger and jalapeno.

In a wok pan, combine dressing and scallions. (I don't know how to really use my wok. A wedding gift that's never been used. So, I went to my old stand by large nonstick skillet.)


Cook 1 to 2 minutes. Add cabbage and carrot and toss until heated through, about 3 to 4 minutes.


(Huge pile of veggies reduces to about half in size with cooking.)

Remove from heat and add cilantro. (I let the flank steak rest after grilling and cut into bite sized pieces right before serving. One thing about this recipe it will dye your cutting board orange.)

Combine sliced flank steak and cabbage slaw and serve on warm pita wrap. (I must warn you and as a reminder to myself say the warm pita does not work well at all. The whole thing gets so soggy about bite 2 and starts to fall a part. Then you start eating all the soggy bites first in a race to eat it before it completely falls a part. I've used flat breads, which are hard to find around me that worked better. Hubby suggested we use a tortilla next time. I thought that was a great idea as there are some very good whole wheat tortillas around me.)

On Kathleen's show she did things slightly different than the recipe that I didn't remember until after I completed the recipe. She did not cook the veggies. She tossed all veggies and dressing as if it were a salad. Placed the meet and uncooked veggies on a warm pita for the meal. Any left over flank steak, dressing and veggies were then stir fried the next day for lunch.
I'm drooling just talking about it, so I hope you'll dive in and give this recipe a try.

Thursday, March 26, 2009

Mama Maroni That's A Tasty Meatball!

Bobby Flay had another Throwdown that interested me. It was about meatballs. While I've had a pretty good recipe for a number of years from a friend of mine that loves to cook. I've always wished the meatballs were a bit more tender. The commercial for the meatball throwdown talked about tender meatballs. I had to watch.

My experience from past Throwdowns was the winning recipe if not Bobby's would not be on the Food Network website. I could understand that. It's their livelihood. Therefore, I record the show, so I can take copious notes. In an effort to get the winning recipe as close as I can. Just for giggles I decided to see if the winning recipe Grandma Maroni's Meatballs was on the Food Network site. To my great surprise it was.
Ingredients
1 pound ground chuck
4 ounces dried bread crumbs
4 large eggs
4 ounces whole milk
6 ounces grated Romano
3 ounces grated Spanish onion
2 ounces finely diced fresh garlic
2 ounces finely chopped fresh Italian parsley leaves
2 ounces finely chopped fresh basil leaves
Directions
Preheat oven to 350 degrees F. Spray a baking sheet with olive oil cooking spray.
Mix all ingredients thoroughly in large bowl. If mixture seems a little loose add more bread crumbs.


Roll meatballs loosely about the size of a golf ball and place on baking sheet. Place into preheated oven for approximately 35 to 40 minutes. Serves 8-10 Enjoy!


It is slightly different than the notes I took from the show. Some ingredients Mike Maroni told the viewer some I guessed on. Here is the recipe I made.
Lynne's Throwdown Meatballs
1 pound ground chuck
4 large eggs
4 ounces Pecorino Romano
1/2 cup dried bread crumbs
4 T finely chopped fresh Italian parsley
3 cloves minced garlic
1/2 cup grated onion

Mix by hand. Make meatballs 1 1/2 ounces about the size of an egg. Bake in a hot oven (425 degrees F).

All ingredients ready for mixing.

How it looked after hand mixing. A great challenge for me as I hate to get my hands sticky and gooey, but combining in a mixer makes the meatballs tough. I've tried it. Worth getting your hands dirty for a good meatball!
I love to use my cookie scoops when I need to measure out a ball of something. Mike Maroni said each meatball should be about 1 1/2 ounce. Being a stickler for good meatballs I weighed each one since there weren't going to be many.

I measured the meatballs out onto my Silpat. I normally bake them on a Silpat, because in the past I use a very lean burger. This recipe using a ground chuck made me change my mind to something with a lip to catch any dripping.

This silicone pan has a lip and I needed it! There was a lot of fat to catch after baking.


I made the meatballs using the above notes/recipe and they were fabulous. The only thing I'd change is they were a bit loose. They didn't fall a part, but they were a bit mushy in the mouth. I would bump up the bread crumbs to 1 cup next time. The recipe made 23 meatballs. The meatballs just melted in your mouth they were so tender and flavorful. I've found that Romano cheese is a must. I've used Parmesan in the past as I usually have it on hand, but the Romano has a stronger flavor that really gives the meatballs a delicious flavor.


The sauce I use is one my cooking friend also gave me. It's very basic and fast. I can make this sauce in the time it takes me to prepare dried pasta. I haven't bought bottle sauce in years.


DeAnn's Tomato Basil Sauce


1/4 cup olive oil
1/2 large onion, finely chopped
2 cloves minced garlic
4 tablespoons minced fresh basil, about 1 handful
4 cups canned crushed tomatoes


Saute' onion, garlic and basil in olive oil until onion is soft. Add tomato sauce and simmer about 30 minutes. Sauce freezes nicely.

I brought the sauce to a good simmer for about 30 minutes.

The meatballs were done by now and I dropped them into the sauce.


I was surprised at how close my sauce was to Maroni's Sauce.

6 ounces good olive oil, not extra-virgin
12 cloves garlic, finely sliced
1 large or 2 medium Spanish onions, finely diced
2 (28-ounce) cans imported crushed tomatoes
1 teaspoon salt
1/2 teaspoon white or black pepper
1 large handful julienned
fresh basil leaves

In a medium saucepan over medium heat, add oil. Once heated add the finely sliced garlic and onions to the pan. Cook over medium heat until soft and slightly brown. Next add the canned crushed tomatoes, salt and pepper and stir. Allow the sauce to come to a simmer and cook for 20 minutes. Remove from the heat and add the julienned basil.

The end result with my 2 recipes for sauce and meatballs were perfection! Delightful tender savory meatballs and a light yet flavorful sauce to accompany them... a meal fit for company, but we ate it all ourselves.

Saturday, October 18, 2008

Wanted! Cowboy Chili


A recipe and a craft project.... Pampered Chefs Cowboy Chili with a small tweak. The recipe calls for layering it in a Pampered Chef small measuring bowl and giving it as a gift. I did that many times and it was greatly received. I'm long past those days now as everyone I know practically got one. I still use the recipe, because it is really good. The recipe was very convenient as you cook the chili straight from the dried beans to chili. No soaking. I've found over the years and let me try and be delicate that the amount of gas from the beans after eaten was greatly increased with this recipe. It occurred to me the only difference in this recipe was that I soak the beans prior to cooking in all my other bean type recipes. Soooooo, I started soaking the beans in this recipe and problem solved. If you want the recipe in it's original state take a look here.


As for the crafting of this 6X6 page it looks simple, but a lot of work went into getting it to look this way. It really was a work in progress for several days before I got it looking the way I saw it in my mind. First I printed the recipe with a western font using a DeskJet printer not inkjet as with the later the printing would age too much. The paper was crumpled on the sides then straightened out (some what). It was then sponged with chocolate chip, creamy caramel and mustard inks to give it an old worn antique look. Next I used deckle scissors to give the edges a torn look. Actual tearing wouldn't have been precise enough for 5 1/2X5 1/2 inch size I needed. I altered small copper brads by heating them each dipping them in silver embossing powder 2 and 3 times melting after each dip. When done I would then count to about 5 and while still warm press them onto a piece of scrap paper to give them a more flatten and dull looking nail head appearance. After assembling the WANTED recipe I attached it to wood grain paper using CM photo splits and glue dots.

Thursday, July 10, 2008

Adventures with Arepas

Last Sunday I decided to make arepas. I saw a Throwdown with Bobby Flay with Arepas. Maribel and Aristides Barrios, NYC restaurateurs who hail from Venezuela were challenged. The food looked SO good and interesting. Arepas are Venezuela's national bread. They are eaten at all meals and throughout the day. These small corncakes are sold in restaurants called areperías, where they are stuffed with all manner of fillings. Arepas are the basically the Venezuelan version of the sandwich. Many different filling can be used, but the gals on Throwdown said the best and most traditional filling is Pabellón. It's their best seller. So, that's what I wanted to make.

Bobby Flay lost the throwdown, so I didn't want to use his recipes on the Food Network. Using notes from the gals that WON the arepa throwdown I went on a search of the internet for recipes that were similar. This was going to be quite a project, but I knew it would be fun and delicious. I'm never scared away by hard work in the kitchen. First I needed ingredients. Ran to the local grocery store Saturday evening and bought just about everything. The produce gal couldn't find a plantain I knew what they looked like despite my complete inexperience with them and I found them. They didn't have the special corn flour I needed. Decided to make a trip to the Mexican grocer in the morning. They had exactly what I needed... precooked white corn meal P.A.N.

According to Maribel and Aristides to make a simple traditionally served Arepa one needs a Venezuelan stew called Pabellón, black beans, fried plantains, arepas, and cojita cheese. I had a lot of cooking ahead of me. I got the boneless chuck roast cooking similar to how I would cook pork for carnitas. Browned roast, then add onion, celery, salt, pepper and enough water to cover everything. I simmered it for 2 hours. While this was simmering I got the presoaked black beans (the reason I went to the store the night before wanted to soak the beans) to cooking with a little browned salt pork and onions. They too simmered for 2 hours.

Once the beef was cooked and shredded, with dog and my daughter hanging around for bites, I could do the final cooking. I followed the Pabellón recipe I found on line with a few changes from the notes from Maribel and Aristides I got off of the Throwdown show. The changes I used, a 3 pound boneless chuck roast, red AND green peppers, 1 can of tomato paste instead of tomatoes and 1 1/2 tsp of ground cumin. I needed about 3 cups of my broth from cooking the meat to moisten it up just right. I did make one mistake in that the peppers and onions should have been finely chopped. My kids would have preferred it from an aesthetic point of view (you know kids it may taste good, but doesn't look good). It looked great to my husband and I and it didn't effect the taste at all. It was SO good. I'll definitely be making this stew again.


After the stew was made I started frying the plantains and frying the arepas (corncakes). Plantains were pretty straight forward. I sliced them like the gals said on throwdown. I must say that the plantains scared me a little. I've never tried them before. I read that you want to get one that is yellow with black speckles or completely black for maximum sweetness. Completely black at the store wasn't an option. Once peeled they are much firmer than a regular banana and had an odd peach hue. After frying I tried one. They have sort of a fried sweet potato flavor and texture if you've ever had tempura sweet potato you'll know exactly what they are like.
The arepas I followed the recipe . Later that day I tried making the arepas the way the Maribel and Aristides had said. The difference being the online recipe used boiling water. It took a very long time for it to cool, so I could shape the arepas for cooking. The gals used lukewarm water and the dough turned out very soft and difficult to shape. I'll need to work on them to maybe find a happy medium between boiling water and lukewarm water. The one exception to the recipe is I only fried them on the griddle as the arepa gals said. The recipe asked them to be baked also.
OK I've got Pabellón, cooked black beans, fried plantain, arepas and grated cojita cheese. Now to assemble. I split the arepa all the way through layered on 2 fried plantain slices, a spoonful of Pabellón, a spoonful of black beans and then a sprinkle of cheese. I then leaned over the plate and took a big bite. WOW it was good and very messy. Maribel and Aristides from the throwdown have their own arepa restaurant in New York and they said people ask for forks. They really raised their noses at this notion as they are to be eaten with one's hands. I am a utensil person. I wanted a fork SO badly, but I didn't want these ladies snickering at me for using a fork. I kept adjusting my grip and the corncake until all was gone. I found out that one recipe of corncakes wasn't enough. It made 8. That's why I made 2 recipes with 2 different methods. I had to make another batch they were SO good.

I found the "What's 4 Eats: International Recipes & Cooking Around the World" website to be a great reference for my adventure into the world of deliciousness. I've placed links all above for the recipes I used. Once everything was cooked it was a very fast and easy meal. We had leftovers for lunch and it seemed even better the 2nd and 3rd day. Then it was all gone. I think I'd like to make this again and have family over. It would be a fun meal to share.