Saturday, September 15, 2012

Zombie Loves Kit Kat

Busy today making some freaking cute cupcakes for my son's birthday.  I started on a Kit Kat theme 2 years ago.  Kit Kat's are my son's favorite candy.  First year I made a Kit Kat cake.  It was a big hit.  The next year I wanted to top the cake and I made a giant Kit Kat.  Again he was very impressed.  Wondering what I'd do this year I saw the cutest book at the craft store.  It is called "Zombie Cupcakes" by Zilly Rosen.  It's quite an adorable book for people who like Halloween and/or Zombies.  While thumbing through it I saw the zombie hand cupcake and knew what I'd do this year.  I'd combine my son's love of Zombies and Kit Kats.  These were very easy to make.  The supplies were easy to find at Michael's.  Then I just followed the directions in the book.  It has cupcake recipes and then decoration directions.  This cupcake was a chocolate oreo cupcake recipe with a chocolate ganache frosting.  It's going to be delicious in addition to adorable.
 
I really liked the lighting of the first picture, but it also made me see I needed to make the hand look more like it came out of the ground.
 
 With cookie crumbs around the bottom of the zombie hand I got the look I wanted.

A whole tray of zombie hand cupcakes.  They are going to be so much fun.

Saturday, September 8, 2012

The Hybrid!

I don't know what to call these except wonderful!  Maybe they should have sinful in the title some where too.  My daughter said, "We should call them "The Hybrid", because they are an offspring of two different baked goods."  I said, "I like it!"

I got the idea to make them from a picture I saw on Pinterest.  I clicked on it and it took me to "My Pampered Kitchen Adventures" Blog.  Click on the link and slowly scroll down and you'll see the picture that intrigued me.  I knew some day I was going to make these wonderful looking brownie/cookie concoctions.  I didn't know it was a Pampered Chef pan at the time.  I had only seen the picture on Pinterest.  While placing an order with my Pampered Chef lady I saw this pan and ordered one.  Not knowing I had the exact pan I needed.  The pan has been hanging out in my kitchen for a few months.  I come a across it every now and then and think I need to make that recipe.  Then life gets in the way.

Well, my daughter was off on one of her surfing trips with friends and I like to send them with a bag of treats even though they aren't kids anymore.  I love surprising them with something yummy and they love getting something yummy.  I decided to make these squares of deliciousness.  Only problem I didn't really have time to make cookie dough or brownie batter.  I decided to follow the blog's recipe exactly and use store bought cookie dough and a brownie mix

 
Thanks to the blog's pictures I could see that she had over filled the pan and I didn't want mine to turn out like that. I wanted neat little squares. I wanted to try and use the smallest amount of cookie and brownie to cover the filling. Some people had suggested that their cookie/brownies got stuck in the pan. I decided to spray my pan with Pam and hope mine didn't get stuck. I felt pretty good that they wouldn't, because cookie dough is the bottom layer and it just doesn't stick. I wasn't going to put in too much brownie mix, so it wouldn't overflow making the whole thing stick. Plus I sprayed my nonstick pan really good with nonstick cooking spray.

 
I did what she had suggested in her blog and used Reese's Peanut Butter cups and Oreos for the filling.

 
I used 1 tablespoon of cookie dough which was one square of the premade cookie dough.

I used about 1 1/2 tablespoons of brownie batter.  I used a cookie scoop for this and it work out well for measuring and neatness.  I just barely had enough brownie mix for 2 pans or 24 cookies.  Had to use my Pampered Chef rubber spatula to scrap the last bit of batter for the last cookie.  It was close.

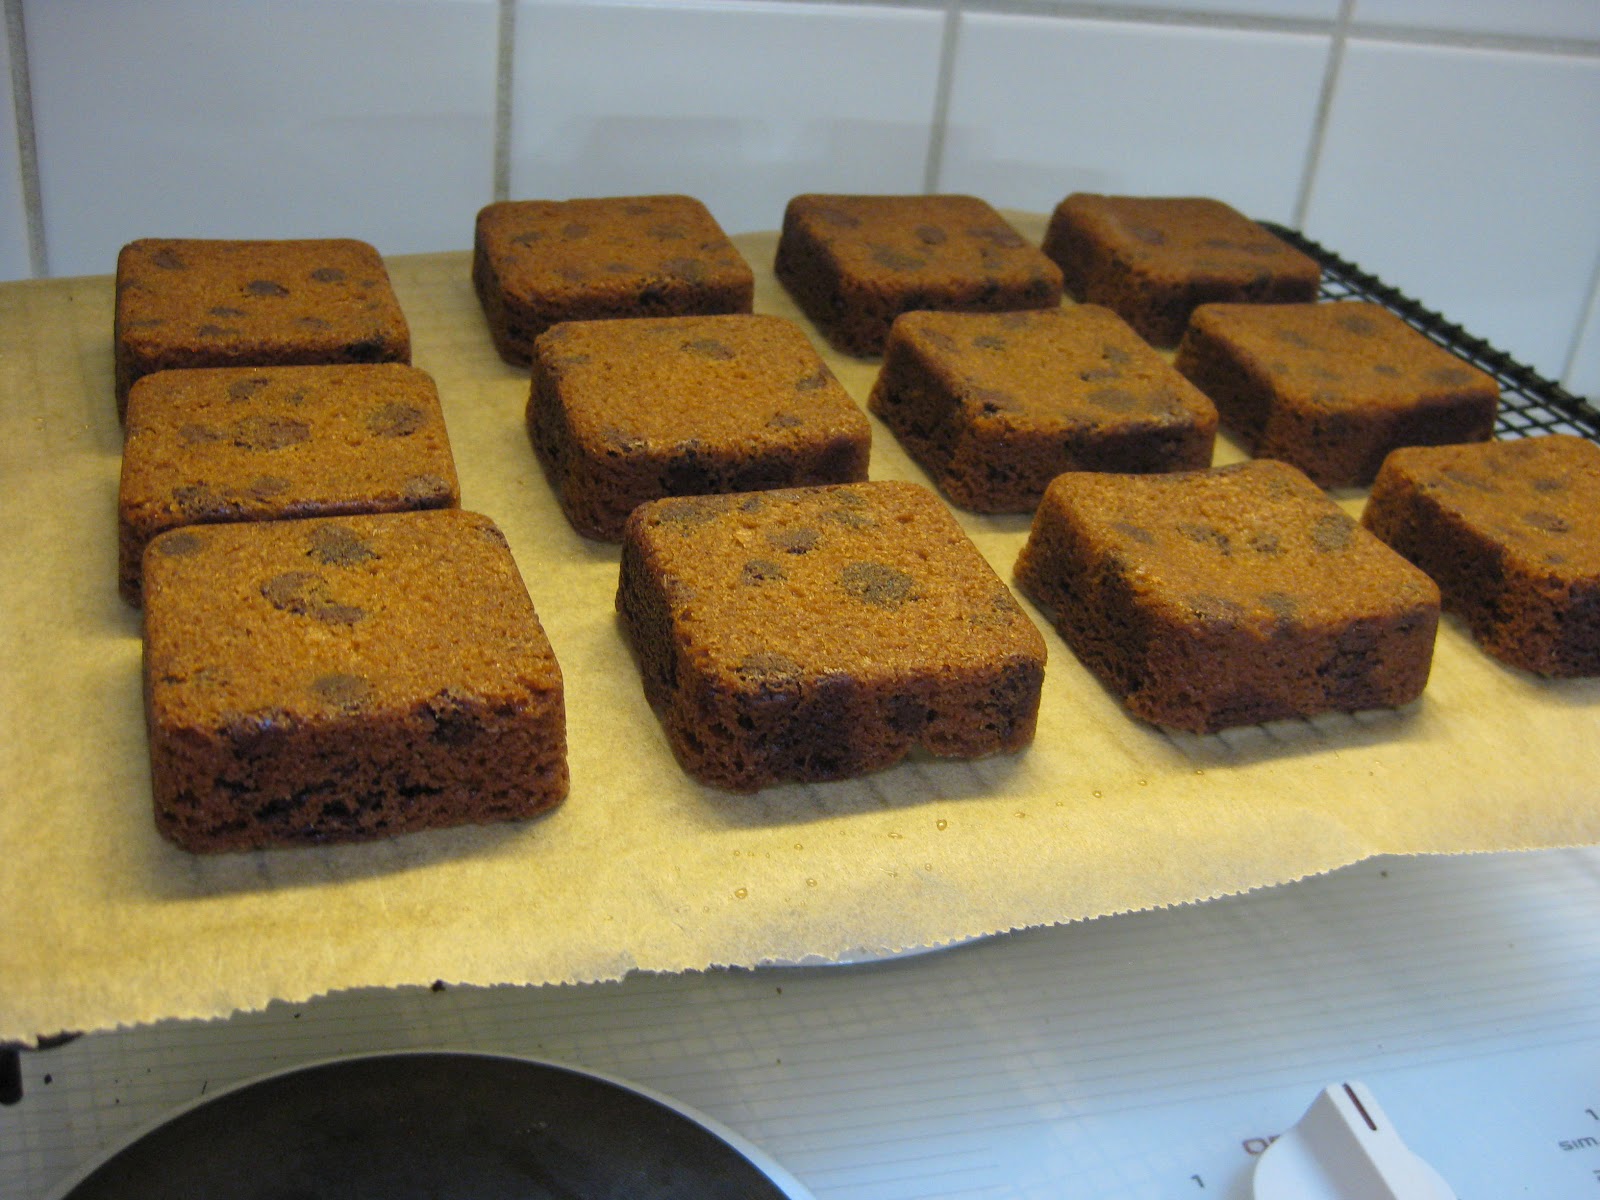
I baked them at 325 degrees F with my convection oven for 18 minutes.  As you can see they came out perfectly the way I wanted.  No over flowing.  Nice neat delectable squares.
 
To make 24 cookie/brownies I used:
1 package Nestle Chocolate Chip Cookie Dough Bar
1 package Ghirardelli Double Chocolate Brownie Mix
12 (15g ea.) Reese's Peanut Butter Cups (not small snack size, but not regular)
12 regular filling Oreos

Moment of truth... they fell right out of pan. No sticking at all.  I'm thinking that maybe some people used a different pan.  The Pampered Chef one truly was nonstick.

 Either side looks impressive.  You could serve them either way.
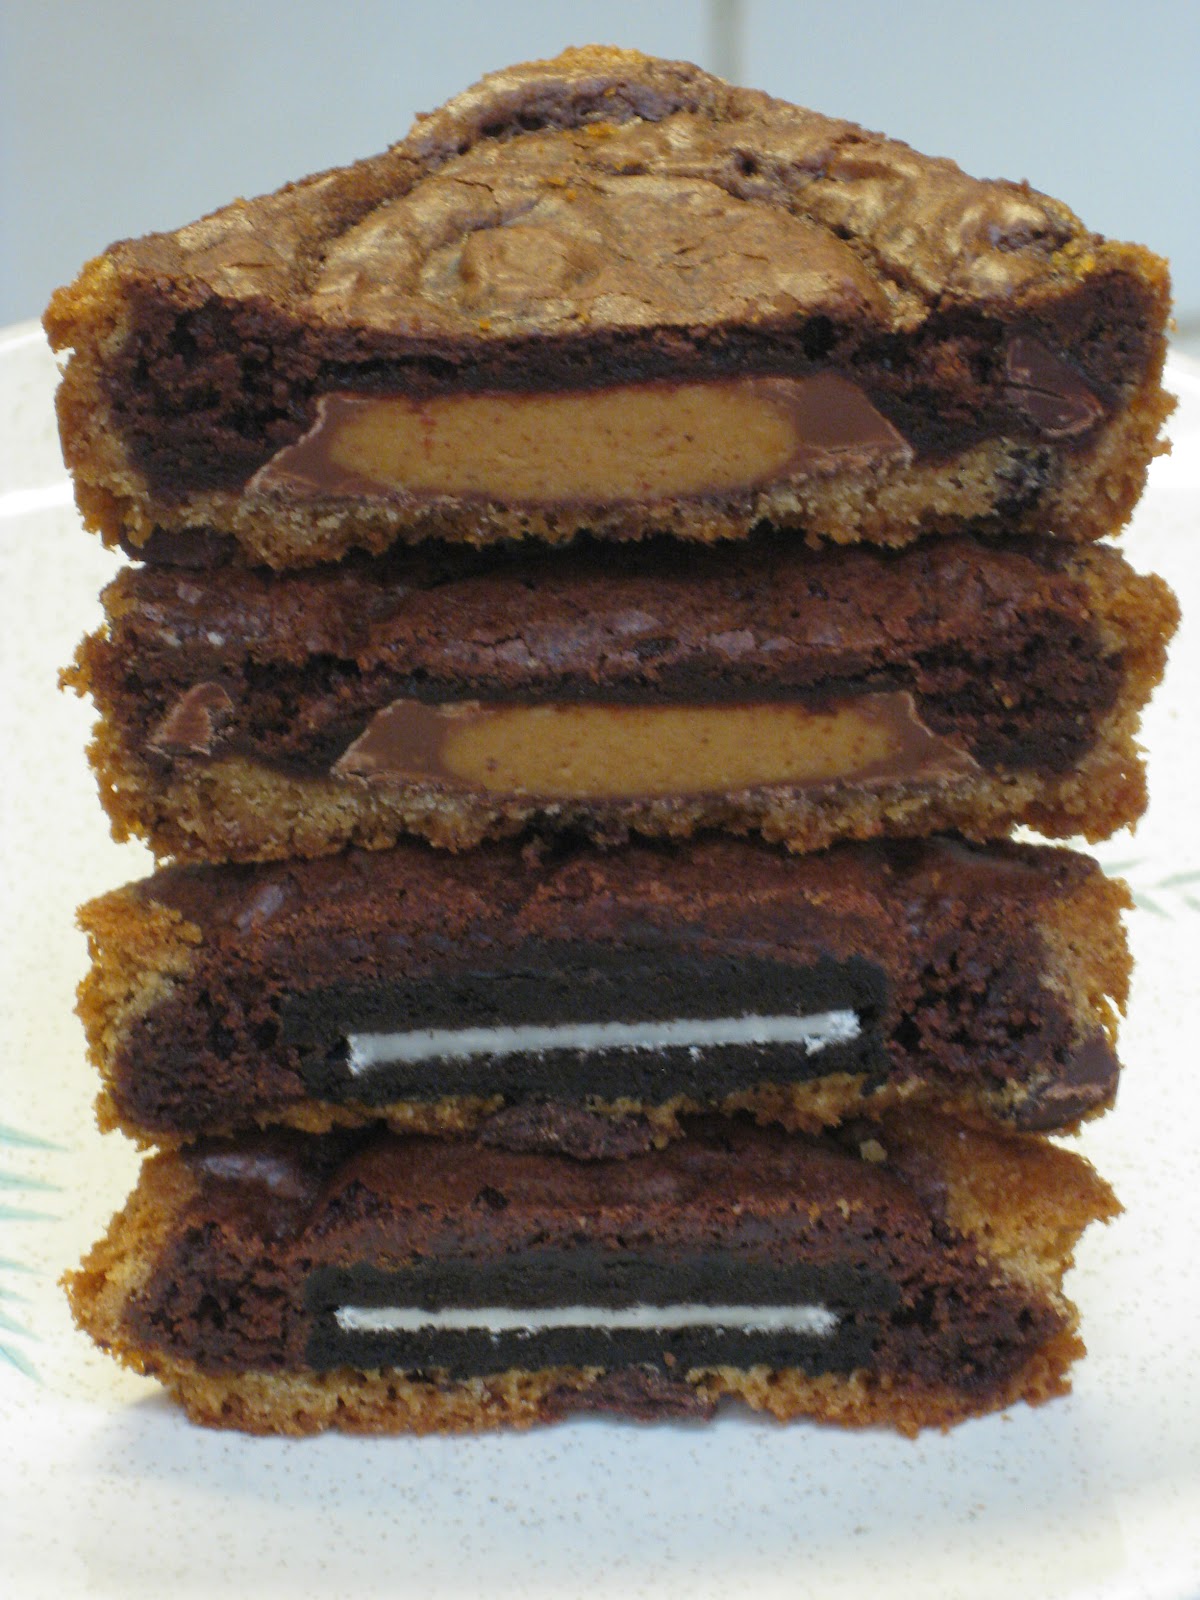
I couldn't remember which ones were peanut butter cup and which were Oreo.  My husband said he could tell by looking at the tops of them.  He said that each filling had their own unique circular footprint.  LOL leave it to a man to get all technical about cookies and their filling.
Thanks to him and his technical thinking I was able to save myself one of each cookie before they were all gone.  Most were eaten before they had cooled.
I wanted to wait til mine were cool so I could see how the filling held up during baking.  I was afraid the peanut butter cups melted together and the Oreo filling melted away.  As you can see they held up great.
Not only did they look great they tasted great.  Our favorite was the peanut butter cup cookie brownie.  But don't get me wrong the Oreo cookie brownies did not go to waste.  It's been less than 24 hours and I have 4 out of 24 left to bring to my cousin and her family.  Good thing I bagged them up early or I probably wouldn't have had them.

Friday, August 31, 2012

Using My Fitness Pal on iPhone


I really like the free app better than Livestrong's paid app.  My Fitness Pal is easier to use on the iPhone and it's well... free.
Created by MyFitnessPal - Free Calorie Counter

Friday, August 3, 2012

I Am Inspired!

Yes, I'm still working out 6-7 hours a week.  Yes, I'm still eating healthily.  Yes, I'm still slowly losing weight.  Not only am I inspired to keep up with my healthy routine, but my new figure is inspiring me to want to knit and/or crochet myself things to wear.  In the past I made hats, scarves, blankets, but never sweaters.  I really didn't want to make something big enough to fit me.  On the knitting machine I'd have to make things in strips in order to make something that fit me.  The machine just wasn't big enough.

I still have a hat or two I'd like to get done for my kids in my ever continuing quest to make a hat they'd like to wear.  But I'm getting geared up to actually make something for me to wear.  I have several patterns in mind.  Lots of yarn to choose from.  I need to get through a summer vacation, a hand knit scarf and then I think my knitting machine will be purring away when I get back.

Saturday, July 21, 2012

Best Craft Show Ever!

Being a crafter I've been to many craft shows over the years and I've been really discouraged going to them the past 10 years.  Not by the quality of crafts necessarily, but by the junkie dime store booths that they are letting in probably to help cover the cost of putting on the craft show.  I find it a real turn off.  Less craft more junk.  I can go to the flea market if I want to buy cheap sunglasses and junkie toys.

The Renegade Craft Fair sat right on the line of crafting and artistry.  No junk at this fair.  Yes, there may be some handmade items that are not your cup of tea, but everything was handmade and slaved over.  I enjoyed looking at each booth and talking with a few of the crafters/artists.  I bought a few things.  An adorable gold fish dish towelnote cards with an adorable poodle on them that looks just like my Little Star, a T-shirt with a T-Rex and a Robot fighting for my son, garden bon bons for my daughter and last but not least a brain ring to help with my Halloween fetish.

I found out about this show from Twinkie Chan.  Who the heck is she?  She's a creative crocheter that specialized in food related items I found out about on Ravelry.  I liked her patterns so much I asked hubby for her book for Christmas (makes things so much easier for hubby.)  She has a blog I like to follow called Twinkie's Blargh.  She mentioned she was going to be at this craft fair in San Francisco and I knew I wanted to go to the fair and to meet her.  So, off I drove in hubby's gas economical car.  It took my 2 hours to get there and park.  It really was a beautiful drive.  No traffic.  No fog.  No agendas other than mine.  Gorgeous views.  Great cheap parking.  It was a day made in heaven.

I found Twinkie Chan's booth at about the hour and a half mark.  Despite being harried from preparing for this show she was friendly and sweet as can be when I asked her to sign my book.  She was just as adorable and cute as one would think.  Just as the food she likes to capture in crochet I wanted to capture her and sit her on a cake.  Oh OK maybe I do sound like a weird stalker.  Really I'm not.

I'm in the middle of making two patterns from her book the Pepperoni Pizza Scarf and Gingerbread Man Scarf.  I bought myself a Twinkie handmade original coffee cup cozy too.  It's done and ready to make me smile.  So, if you don't want to make something yourself you can buy some of her handy work.  She did a beautiful job on the coffee cozy, which reminds me of a Red Velvet Cupcake.

Friday, July 20, 2012

Things I Want To Punch In The Face

I discovered this blog (Things I Want To Punch In The Face) and I am so down with it.  This gal (Jennifer Worick) and I are like one.  We feel the same way about a lot of things.  She describes things I want to punch in the face as: "1) an expression made wildly popular by this blog; 2) a humorous way to convey annoyance or frustration over those little things in life that bug; 3) petty peeves warranting a tongue-in-cheek lashing but involving no physical retribution. Synonyms: chap your hide, get your goat, rub the wrong way; Antonyms: make out with, love so much you should marry it, float your boat, blow your skirt up."

It's not as if I'd really punch somone in the face, but sometimes I just feel like it would solve a lot of problems if I could.  Then again maybe that's why the prisons are over crowded.  Crowded with people who couldn't control their urge to actually punch someone in the face.  Fortunately, I have no such problem.

So, in honor of my new found favorite blog I'm going to tell you the thing I want to punch in the face today....

OK Mr. Lazy Ass Muscle Man do you really need to squeeze between the rowing machines occupied by rowers one being myself to get to the treadmills?  Do you really need to save yourself 20 steps by not walking around the treadmills to get on a treadmill and do some.... walking?  Do you really need to bump into the elbows of the people rowing or in my case make me pull in my elbows, so you can do 20 feet less walking before you get on the treadmill and walk.  You're just rude.

Sunday, July 15, 2012

Vitamix - My New Love

I'd been eyeballing the Vitamix blender for years, but $500 for a blender...YIKES!  A few years ago wanting to get more fruits and veggies into my day I bought a juicer.  It was probably around $300.  I did enjoy juicing.  Only problem is I didn't do it as much as I thought I would for 2 reasons.  One it would extract all the pulp/fiber from the fruits and veggies which seemed counterproductive to a health regimen.  Secondly, OMG what a pain in the butt to clean.  All I wanted to do was sit down and enjoy a glass of juice, but I had 30 minutes of washing to do.  Don't dare let it sit and soak or it would be days before I'd get around to the chore and I do mean chore of cleaning it.  I guess there is a 3rd reason I didn't like juicing.  As I said it extracted the pulp and I'd have this big bowl of pulp and it seemed like such a waste to throw it away.  There were recipes for baking up a loaf of something with the pulp added, but it was not appetizing at all.

So, I was at Costco a few months ago and they were selling the Vitamix again.  I had heard from 2 friends and my trainer over the course of several months expounding on the virtues of their Vitamix blenders.  I decided to take the plunge.  At Costco the blender was still $400.  Still seemed steep, but I took the plunge.  I bought a bunch of fruit and veggies at Costco before I came home and began making a smoothie.  I fell in love.  The next thing I made was the broccoli cheese soup.  It showed the blender steaming in the videos that came with the blender.  I just couldn't believe it.  It's true in 5 minutes I had steaming delicious broccoli cheese soup.

These days I mostly make a fruit and veggie smoothie in the morning for breakfast.  I feel like I can't start my day without my zap of healthy fruits and veggies.

And the major big plus of the Vitamix is the cleaning!!  I rinse out the blender and lid.  Add 5 cups of really warm water, 2 drops of dish soap as per the instructions with Vitamix.  Run blender on high for 1 minute.  Rinse out the soap and sit in the dish drainer.  BAM!  Ready for next smoothie.  While it's doing it's 1 minute of cleaning I'm getting the straw for my smoothie and enjoying a sip.

My favorite is the Sailor Man Green Smoothie.  Why its called the Sailor Man I'm not sure.  I would think it would have lime in it to prevent scurvy.  I made it the first few times exactly like the recipe called for.  It came out this gorgeous green color and tasted so good.  Then I started to tweak it to my preferences.  I just don't have vanilla yogurt on hand I had plain nonfat.  So, I use it and add a squirt of honey.  Don't want my smoothie to be sour.  Then I got to not liking having a half of a brown apple waiting for the next days smoothie.  My daughter suggested I just throw the whole apple in.  She's so smart, but I wanted something more healthy and started leaving the apple out and putting in a carrot.  I usually have frozen bananas and frozen pineapple ready for the smoothie, but I occasionally have fresh.  Because I work out so much these days and I'm prone to leg cramps I'll sometimes had some coconut water for some extra potassium.  The added coconut water also helps the smoothie whirl up.  Sometimes if I have frozen pineapple, frozen banana and ice it will become real thick and not easy to drink right away.  Mama needs to drink her smoothie and get to gym!

Below is the original Sailor Man Green Smoothie recipe.  Hope you try it soon it's really good.

1/2 banana, peeled
1/2 cup (80 g)grapes
1 cup (30 g) fresh spinach
1/2 apple, cored
1/4 cup (60 ml) vanilla yogurt
2 oz (56 g) pineapple
1 cup (240 ml) ice

Place all ingredients into the container in the order listed and secure lid.


Select Variable 1.

Turn machine on and quickly increase speed to Variable 10, then to High. If necessary, use the tamper to press the ingredients into the blades while processing.

Blend for 1 minute or until smooth.