Monday, January 28, 2013

Chinese Style Steamed Fish

While I was in Hong Kong there were many delicious things to eat.  Found out the Chinese food and Dim Sum served right here in my town is very close to what the real stuff is like.  What I wanted though was something I could make at home and enjoy.  We ate several meals at my SILs parents house and they were all so good.  The tools, ingredients, and recipes seemed a bit over my head.  Then one night what they called a Chinese steamed fish was served.  It was so fresh and delicious.  I thought it could really solve my issue of wanting to eat fish once a week, but not finding any recipes that made a store bought fish palatable (dang my dad for being such a good fisherman when I was a kid).
 
With my SIL translating I told my FIL that the fish was delicious and I'd like to make it when I get home.  Could he tell me how it was made?  He gave me a look "of course I will tell you, but it's really nothing special."  He went into the kitchen and brought out a bottle of Season Soy Sauce for Fish Lee Kum Kee brand.  I recognized the brand immediately as something sold here in the states.  I thought there may be some hope I can duplicate this recipe.  I found the soy sauce, but it's called Season Soy Sauce for Seafood and in parenthesis is says "very good with fish."  The FIL told me to use spring onions, Chinese parsley, and ginger.  Just steam it.
 
After I got back to the states I thought I'd look for a recipe online and found something even better Lee Kum Kee has made a video of how to make Chinese Style Steamed Fish.  The over dubbing of English is a bit silly sounding at times, but it's very helpful.  What I found out from the video is the fish is steamed right on the plate it's served on. I had no idea.
 
I went shopping for green onions, cilantro, ginger, Seasoned Soy Sauce for Seafood and a whole fish of course.  Who would have thought finding a whole fish was going to be the hard part.  I looked at the Chinese Market near me.  Nope.  I went to Whole Foods and they had sardines not what I was looking for.  I went to a fish market near me.  Nope.  Then I thought I'd try my 2 local grocery stores.  Nope.  So, I called my brother as I remembered him saying my SIL occasionally makes steamed fish.  He said his local Chinese market had whole fish.  That they even have them alive in a tank.  Talk about fresh.  Not very convenient for me to pick one up, but it is close to where my husband works for future reference.  Sunday though we were in the area and I said, "Let's pick up a fish."  They only had carp in the live tank and I'm sorry my dad conditioned me to not like carp.  They did have a nice Striped Bass on ice and I bought it.  They cleaned and scaled it for me.
 
Once home it was time to get started.  I pulled out the Farberware Wok I got as a wedding present 25 years ago and sad to say I've never used it.  I kept it all these years as I've always wanted to use it.  After cleaning it I plugged it in to make sure it worked.  It did we're in business.  I knew I could steam fish on one of my dinner plates as they are oven safe.  Next I began peeling and slicing the ginger.  I sliced green onions for under the fish and chopped some to sprinkle on top.  I then chopped up the cilantro.  I got the fish out rinse, dried it and rubbed it with salt.  I layed it on my bed of green onions.  I placed the slices of ginger on top.  The wok was set up and boiling and I set the fish inside and tried to close the lid.  My fish was a tail too long for the wok.  I didn't want to chop the tail off.  The presentation just wouldn't be what I wanted.  So, not to be detered I folded the tail up with the lid and set the lid down.  So, the tail is a little wonkie.  At least it still had the tail.  I set a time for 10 minutes.  While it was steaming I measured out my Seasoned Soy Sauce and cooking oil.
 
Once the fish was steamed my plate was filled to the brim with I guess fish broth.  I really didn't know what to do with it, so I tipped the plate over the sink and poured it off.  I didn't remember the plate being full of anything, but soy sauce, oil, green onions and cilantro in Hong Kong.  After removing ginger I sprinkled fish with sliced green onion and chopped cilantro.  I then heated the oil poured it over the fish.  I could hear the fish crackle as I did this.  I warmed the soy sauce and poured it over and it was ready to serve.  I couldn't believe that this fish looked just like what I had in Hong Kong.  As we ate it I was so pleased that it taste equally as good.
 
This morning my son said he had a dream about my steamed fish.  He said he had a whole fish to himself and ate it leaving only a plate of bones behind.  In the dream when his father asked for some steamed fish he threw the plate of bones at him.  Dreams can be so funny.

I think that it's a great compliment if people are dreaming about something you cooked.  We will definitely be doing this again and again and again.
Chinese Style Steamed Fish
 
1 1/2 - 2 pounds fresh fish
6 slices fresh ginger
3-6 stalks green onions
3 sprigs of cilantro
3 T cooking oil
6-8 T Season Soy Sauce for Seafood
 
See video for instructions on how to make you Chinese Style Steamed Fish. 

Thursday, November 15, 2012

Cinnamon Pumpkin Seed Brittle

I call the below recipe "Aunt Ruthie's Microwave Nut Brittle."  She gave me a microwave cookbook for a wedding present and she specifically pointed out this recipe as being good.  Boy, was she right.  25 years later I still make it every holiday season.
 
I started a bit early this year as I saw a possible variant that sounded so good.  The recipe had pumpkin seeds, which are my new love this year.  I put them on salads, but thought Cinnamon Pumpkin Seed Brittle sounded wonderful.  It was great!  Loved the flavor of the roasted pumpkin seeds and the cinnamon.


I decided to just add the new ingredients to my microwave nut brittle recipe since it's so easy.  To the below recipe I add 1 teaspoon of cinnamon and 1 cup of roasted unsalted pumpkin seeds as the nuts.
 
The cinnamon goes in when I add the butter, vanilla and nuts.  And of course pumpkin seeds in for the nuts.  Make sure when the cinnamon goes in you stir quickly and get the lumps of cinnamon stirred in.
 
What I found facinating (yes I'm easily entertained in the kitchen) is when roasting the pumpkin seeds at 350 degrees F they pop.  They looked like Mexican jumping beans!  The pumpkin seeds only needed 5 minutes in the oven and they are plenty roasted.  I took a pretty poor video as it had to be done through the oven window, so the heat would make them pop.  You can totally see them pop though.


So, below is the basic brittle recipe and the method I use to cook it.  Just remember to add the new ingredients for a wonderful holiday treat.
 
Microwave Nut Brittle

1/2 cup light corn syrup
1 cup white sugar
2 teaspoons butter
1 teaspoon vanilla extract
1 cup roasted nuts (peanuts, pecans, macadamia nuts are all very good)
1 teaspoon baking soda

Lightly grease a cookie sheet (or get out your Silpat). In a 2 quart ovenware with handle, combine corn syrup and sugar. Stir well. Cook on high for 4 minutes. Do not cover. (Yes, I microwave my wooden spoon. Then I don't have a sticky spoon to lay down between steps. Use a hot mitt though the spoon gets scalding hot.)

Add butter, vanilla and nuts, mixing well. Cook on high for 4 minutes.

Stir in baking soda. Quickly, (I DO MEAN FAST) pour mixture onto lightly greased cookie sheet. Allow to cool 1 hour. Breaks into bite sized pieces. Yields - 3/4 pound.

(To break up I pick it up by the edge and tap it gently on the Silpat. Break into nice size pieces.)


Wednesday, October 31, 2012

Candy Apples

(scary like hot lava... be very careful)
Dear daughter said she likes candy apples not caramel apples.  Well, I've never made candy or candied apples and thought it would be a fun project.  My dear father picked and gave me 40 pounds of apples and thought "perfect" won't have to decide what kind of apple to use.

I searched the Internet for recipes and they are all basically the same.... sugar, corn syrup, water and food color.  Some add cinnamon flavoring, but DD said no to that.  Cook with a candy thermometer to some where between 280 degrees to 310 degrees depending on the recipe you go with.  I went with the "Mom's Who Think" recipe.  They suggested clove oil and that sounded good to me, but DD said no to cinnamon I better say no to clove.  Easy recipe as I had all the ingredients and supplies at home.  No shopping to do.  Win win.

I had cookie sticks and decided to use them.  Everything from Popsicle sticks to bamboo skewers were suggested.  One thing I didn't even think of as I chose my apples for this recipe was do they stand up straight when sitting on a flat surface.  I had 3 that sat at a strange angle and one that wouldn't stand up at all unless on an angled surface.  Thank goodness for the lip of my pan as you can see the apple on the far left in the back is using it to stay upright.

One thing I noticed most pictures I saw the candied apples had bubbles.  I thought it was the bubbling candy mixture that left bubbles, but I found out that when I put an apple into the hot candy the apple exuded bubbles.  Nothing I could really do about that.  Honestly, I didn't think anyone would say, "That candied apple has bubbles I'm not eating it!"  I did find that the cooler the candy got the less bubbles, but the candy was thicker and it wouldn't swirl on a apple very well.  If I were to do this again that is something to experiment with.

Since I've made candy the recipe was pretty cut and dry.  Cook sugar, corn syrup, water, food coloring mixture until it reached 290 degrees F.  Hard crack on my candy thermometer.  I must say watching the candy bubble and boil til it reached the heat it needed I could see where the candy apple red color comes from for cars.  It's a GORGEOUS color.  After bubbling subsides swirl apples that have been placed on a stick in candy and set on a nonstick surface.  My apples were small so I got 12 covered.

They cooled quickly and DD couldn't wait to try one.  They were as I remembered hard as a rock.  My comment to DD before she bit into one was "don't break a tooth."  She tried cutting the apple into slices and eating it, but still the candy went straight to ones teeth and got stuck.  With lots of saliva and picking one could get it off, but didn't make for a very enjoyable eating experience.

Our verdict... candy apples are beautiful from a far.

Saturday, September 15, 2012

Zombie Loves Kit Kat

Busy today making some freaking cute cupcakes for my son's birthday.  I started on a Kit Kat theme 2 years ago.  Kit Kat's are my son's favorite candy.  First year I made a Kit Kat cake.  It was a big hit.  The next year I wanted to top the cake and I made a giant Kit Kat.  Again he was very impressed.  Wondering what I'd do this year I saw the cutest book at the craft store.  It is called "Zombie Cupcakes" by Zilly Rosen.  It's quite an adorable book for people who like Halloween and/or Zombies.  While thumbing through it I saw the zombie hand cupcake and knew what I'd do this year.  I'd combine my son's love of Zombies and Kit Kats.  These were very easy to make.  The supplies were easy to find at Michael's.  Then I just followed the directions in the book.  It has cupcake recipes and then decoration directions.  This cupcake was a chocolate oreo cupcake recipe with a chocolate ganache frosting.  It's going to be delicious in addition to adorable.
 
I really liked the lighting of the first picture, but it also made me see I needed to make the hand look more like it came out of the ground.
 
 With cookie crumbs around the bottom of the zombie hand I got the look I wanted.

A whole tray of zombie hand cupcakes.  They are going to be so much fun.

Saturday, September 8, 2012

The Hybrid!

I don't know what to call these except wonderful!  Maybe they should have sinful in the title some where too.  My daughter said, "We should call them "The Hybrid", because they are an offspring of two different baked goods."  I said, "I like it!"

I got the idea to make them from a picture I saw on Pinterest.  I clicked on it and it took me to "My Pampered Kitchen Adventures" Blog.  Click on the link and slowly scroll down and you'll see the picture that intrigued me.  I knew some day I was going to make these wonderful looking brownie/cookie concoctions.  I didn't know it was a Pampered Chef pan at the time.  I had only seen the picture on Pinterest.  While placing an order with my Pampered Chef lady I saw this pan and ordered one.  Not knowing I had the exact pan I needed.  The pan has been hanging out in my kitchen for a few months.  I come a across it every now and then and think I need to make that recipe.  Then life gets in the way.

Well, my daughter was off on one of her surfing trips with friends and I like to send them with a bag of treats even though they aren't kids anymore.  I love surprising them with something yummy and they love getting something yummy.  I decided to make these squares of deliciousness.  Only problem I didn't really have time to make cookie dough or brownie batter.  I decided to follow the blog's recipe exactly and use store bought cookie dough and a brownie mix

 
Thanks to the blog's pictures I could see that she had over filled the pan and I didn't want mine to turn out like that. I wanted neat little squares. I wanted to try and use the smallest amount of cookie and brownie to cover the filling. Some people had suggested that their cookie/brownies got stuck in the pan. I decided to spray my pan with Pam and hope mine didn't get stuck. I felt pretty good that they wouldn't, because cookie dough is the bottom layer and it just doesn't stick. I wasn't going to put in too much brownie mix, so it wouldn't overflow making the whole thing stick. Plus I sprayed my nonstick pan really good with nonstick cooking spray.

 
I did what she had suggested in her blog and used Reese's Peanut Butter cups and Oreos for the filling.

 
I used 1 tablespoon of cookie dough which was one square of the premade cookie dough.

I used about 1 1/2 tablespoons of brownie batter.  I used a cookie scoop for this and it work out well for measuring and neatness.  I just barely had enough brownie mix for 2 pans or 24 cookies.  Had to use my Pampered Chef rubber spatula to scrap the last bit of batter for the last cookie.  It was close.

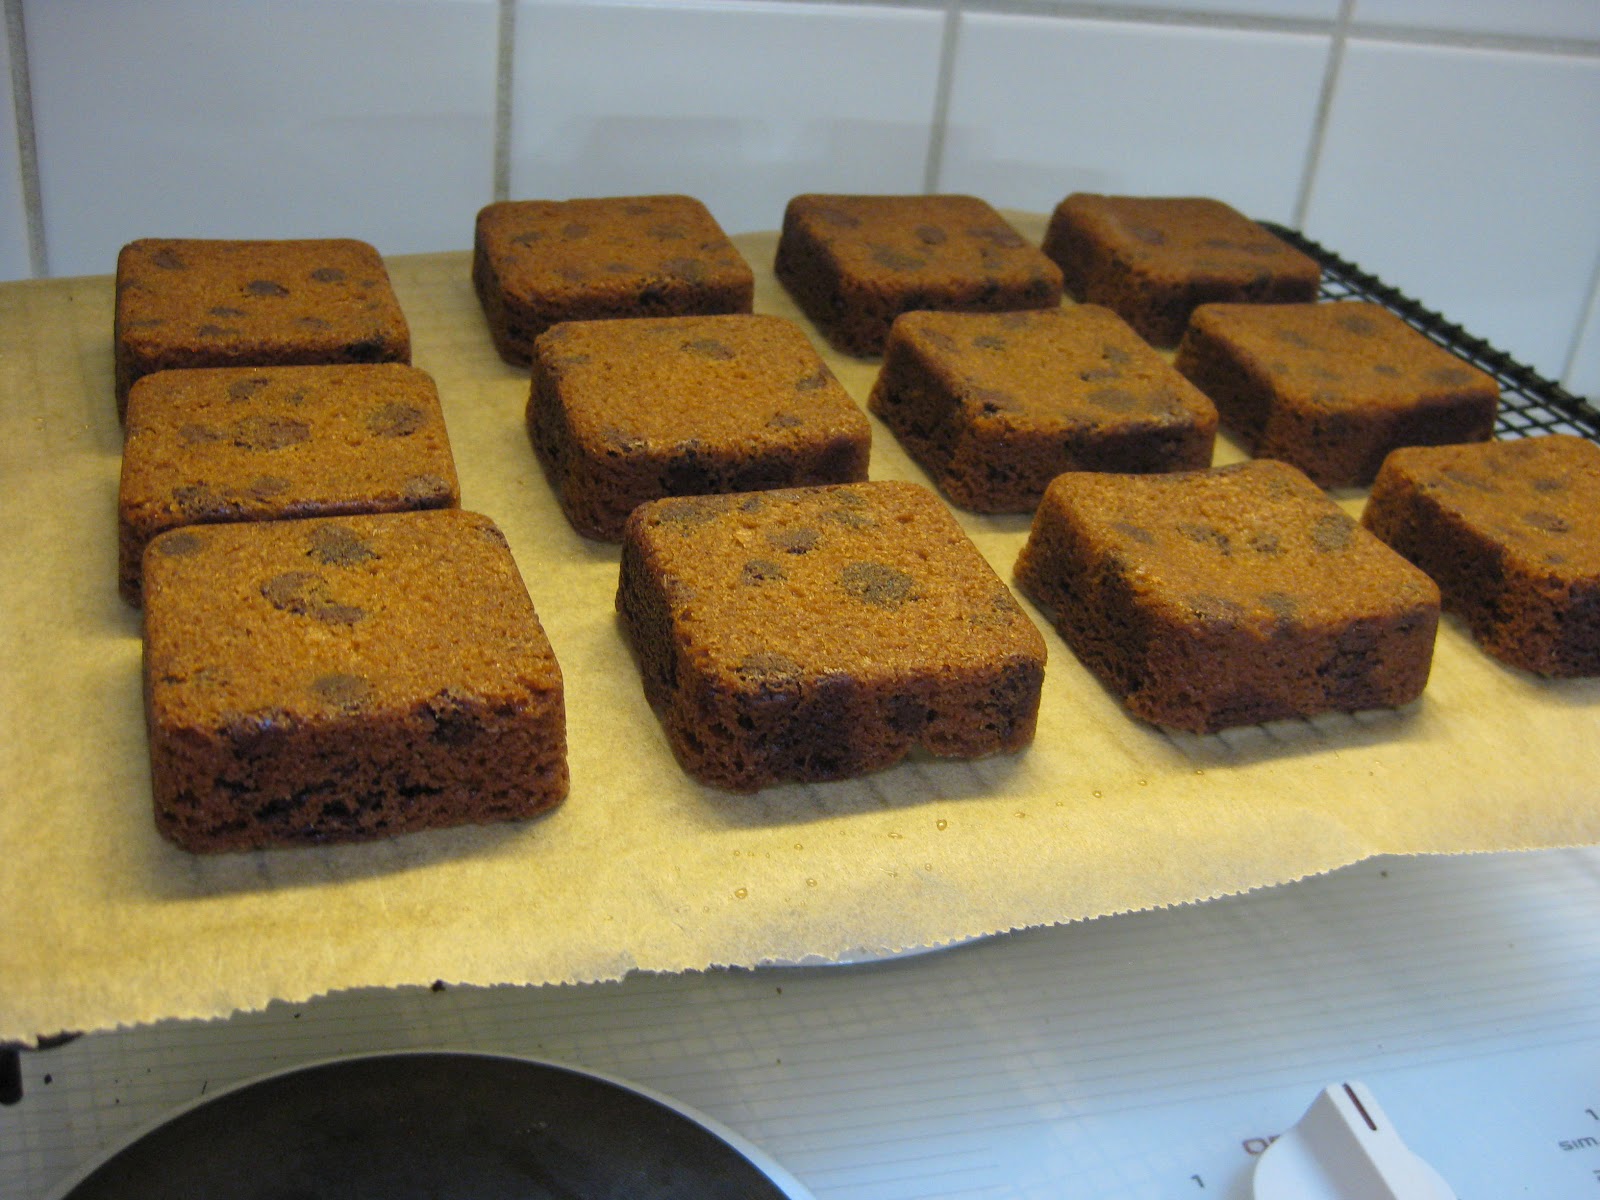
I baked them at 325 degrees F with my convection oven for 18 minutes.  As you can see they came out perfectly the way I wanted.  No over flowing.  Nice neat delectable squares.
 
To make 24 cookie/brownies I used:
1 package Nestle Chocolate Chip Cookie Dough Bar
1 package Ghirardelli Double Chocolate Brownie Mix
12 (15g ea.) Reese's Peanut Butter Cups (not small snack size, but not regular)
12 regular filling Oreos

Moment of truth... they fell right out of pan. No sticking at all.  I'm thinking that maybe some people used a different pan.  The Pampered Chef one truly was nonstick.

 Either side looks impressive.  You could serve them either way.
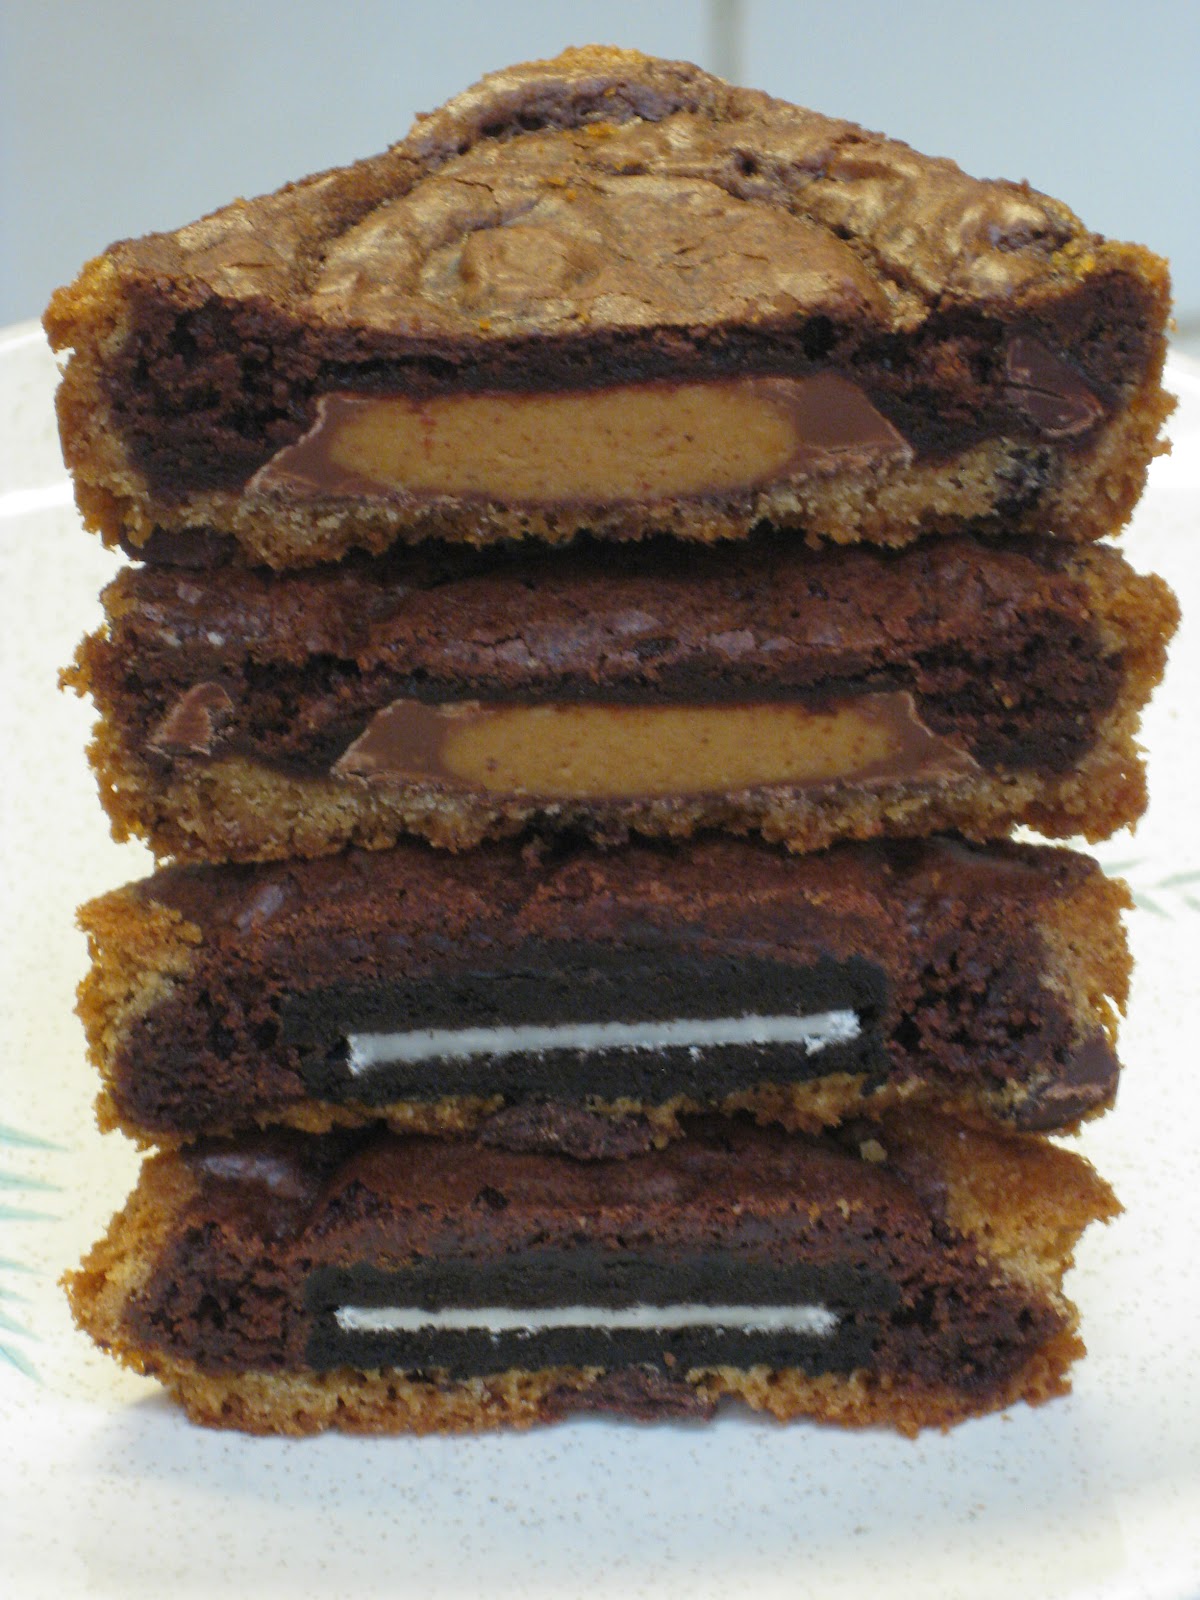
I couldn't remember which ones were peanut butter cup and which were Oreo.  My husband said he could tell by looking at the tops of them.  He said that each filling had their own unique circular footprint.  LOL leave it to a man to get all technical about cookies and their filling.
Thanks to him and his technical thinking I was able to save myself one of each cookie before they were all gone.  Most were eaten before they had cooled.
I wanted to wait til mine were cool so I could see how the filling held up during baking.  I was afraid the peanut butter cups melted together and the Oreo filling melted away.  As you can see they held up great.
Not only did they look great they tasted great.  Our favorite was the peanut butter cup cookie brownie.  But don't get me wrong the Oreo cookie brownies did not go to waste.  It's been less than 24 hours and I have 4 out of 24 left to bring to my cousin and her family.  Good thing I bagged them up early or I probably wouldn't have had them.

Friday, August 31, 2012

Using My Fitness Pal on iPhone


I really like the free app better than Livestrong's paid app.  My Fitness Pal is easier to use on the iPhone and it's well... free.
Created by MyFitnessPal - Free Calorie Counter

Friday, August 3, 2012

I Am Inspired!

Yes, I'm still working out 6-7 hours a week.  Yes, I'm still eating healthily.  Yes, I'm still slowly losing weight.  Not only am I inspired to keep up with my healthy routine, but my new figure is inspiring me to want to knit and/or crochet myself things to wear.  In the past I made hats, scarves, blankets, but never sweaters.  I really didn't want to make something big enough to fit me.  On the knitting machine I'd have to make things in strips in order to make something that fit me.  The machine just wasn't big enough.

I still have a hat or two I'd like to get done for my kids in my ever continuing quest to make a hat they'd like to wear.  But I'm getting geared up to actually make something for me to wear.  I have several patterns in mind.  Lots of yarn to choose from.  I need to get through a summer vacation, a hand knit scarf and then I think my knitting machine will be purring away when I get back.