Thursday, November 15, 2012

Cinnamon Pumpkin Seed Brittle

I call the below recipe "Aunt Ruthie's Microwave Nut Brittle."  She gave me a microwave cookbook for a wedding present and she specifically pointed out this recipe as being good.  Boy, was she right.  25 years later I still make it every holiday season.
 
I started a bit early this year as I saw a possible variant that sounded so good.  The recipe had pumpkin seeds, which are my new love this year.  I put them on salads, but thought Cinnamon Pumpkin Seed Brittle sounded wonderful.  It was great!  Loved the flavor of the roasted pumpkin seeds and the cinnamon.


I decided to just add the new ingredients to my microwave nut brittle recipe since it's so easy.  To the below recipe I add 1 teaspoon of cinnamon and 1 cup of roasted unsalted pumpkin seeds as the nuts.
 
The cinnamon goes in when I add the butter, vanilla and nuts.  And of course pumpkin seeds in for the nuts.  Make sure when the cinnamon goes in you stir quickly and get the lumps of cinnamon stirred in.
 
What I found facinating (yes I'm easily entertained in the kitchen) is when roasting the pumpkin seeds at 350 degrees F they pop.  They looked like Mexican jumping beans!  The pumpkin seeds only needed 5 minutes in the oven and they are plenty roasted.  I took a pretty poor video as it had to be done through the oven window, so the heat would make them pop.  You can totally see them pop though.


So, below is the basic brittle recipe and the method I use to cook it.  Just remember to add the new ingredients for a wonderful holiday treat.
 
Microwave Nut Brittle

1/2 cup light corn syrup
1 cup white sugar
2 teaspoons butter
1 teaspoon vanilla extract
1 cup roasted nuts (peanuts, pecans, macadamia nuts are all very good)
1 teaspoon baking soda

Lightly grease a cookie sheet (or get out your Silpat). In a 2 quart ovenware with handle, combine corn syrup and sugar. Stir well. Cook on high for 4 minutes. Do not cover. (Yes, I microwave my wooden spoon. Then I don't have a sticky spoon to lay down between steps. Use a hot mitt though the spoon gets scalding hot.)

Add butter, vanilla and nuts, mixing well. Cook on high for 4 minutes.

Stir in baking soda. Quickly, (I DO MEAN FAST) pour mixture onto lightly greased cookie sheet. Allow to cool 1 hour. Breaks into bite sized pieces. Yields - 3/4 pound.

(To break up I pick it up by the edge and tap it gently on the Silpat. Break into nice size pieces.)


Wednesday, October 31, 2012

Candy Apples

(scary like hot lava... be very careful)
Dear daughter said she likes candy apples not caramel apples.  Well, I've never made candy or candied apples and thought it would be a fun project.  My dear father picked and gave me 40 pounds of apples and thought "perfect" won't have to decide what kind of apple to use.

I searched the Internet for recipes and they are all basically the same.... sugar, corn syrup, water and food color.  Some add cinnamon flavoring, but DD said no to that.  Cook with a candy thermometer to some where between 280 degrees to 310 degrees depending on the recipe you go with.  I went with the "Mom's Who Think" recipe.  They suggested clove oil and that sounded good to me, but DD said no to cinnamon I better say no to clove.  Easy recipe as I had all the ingredients and supplies at home.  No shopping to do.  Win win.

I had cookie sticks and decided to use them.  Everything from Popsicle sticks to bamboo skewers were suggested.  One thing I didn't even think of as I chose my apples for this recipe was do they stand up straight when sitting on a flat surface.  I had 3 that sat at a strange angle and one that wouldn't stand up at all unless on an angled surface.  Thank goodness for the lip of my pan as you can see the apple on the far left in the back is using it to stay upright.

One thing I noticed most pictures I saw the candied apples had bubbles.  I thought it was the bubbling candy mixture that left bubbles, but I found out that when I put an apple into the hot candy the apple exuded bubbles.  Nothing I could really do about that.  Honestly, I didn't think anyone would say, "That candied apple has bubbles I'm not eating it!"  I did find that the cooler the candy got the less bubbles, but the candy was thicker and it wouldn't swirl on a apple very well.  If I were to do this again that is something to experiment with.

Since I've made candy the recipe was pretty cut and dry.  Cook sugar, corn syrup, water, food coloring mixture until it reached 290 degrees F.  Hard crack on my candy thermometer.  I must say watching the candy bubble and boil til it reached the heat it needed I could see where the candy apple red color comes from for cars.  It's a GORGEOUS color.  After bubbling subsides swirl apples that have been placed on a stick in candy and set on a nonstick surface.  My apples were small so I got 12 covered.

They cooled quickly and DD couldn't wait to try one.  They were as I remembered hard as a rock.  My comment to DD before she bit into one was "don't break a tooth."  She tried cutting the apple into slices and eating it, but still the candy went straight to ones teeth and got stuck.  With lots of saliva and picking one could get it off, but didn't make for a very enjoyable eating experience.

Our verdict... candy apples are beautiful from a far.

Saturday, September 15, 2012

Zombie Loves Kit Kat

Busy today making some freaking cute cupcakes for my son's birthday.  I started on a Kit Kat theme 2 years ago.  Kit Kat's are my son's favorite candy.  First year I made a Kit Kat cake.  It was a big hit.  The next year I wanted to top the cake and I made a giant Kit Kat.  Again he was very impressed.  Wondering what I'd do this year I saw the cutest book at the craft store.  It is called "Zombie Cupcakes" by Zilly Rosen.  It's quite an adorable book for people who like Halloween and/or Zombies.  While thumbing through it I saw the zombie hand cupcake and knew what I'd do this year.  I'd combine my son's love of Zombies and Kit Kats.  These were very easy to make.  The supplies were easy to find at Michael's.  Then I just followed the directions in the book.  It has cupcake recipes and then decoration directions.  This cupcake was a chocolate oreo cupcake recipe with a chocolate ganache frosting.  It's going to be delicious in addition to adorable.
 
I really liked the lighting of the first picture, but it also made me see I needed to make the hand look more like it came out of the ground.
 
 With cookie crumbs around the bottom of the zombie hand I got the look I wanted.

A whole tray of zombie hand cupcakes.  They are going to be so much fun.

Saturday, September 8, 2012

The Hybrid!

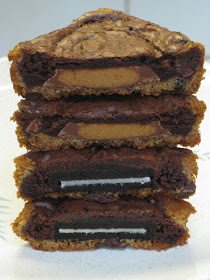
I don't know what to call these except wonderful!  Maybe they should have sinful in the title some where too.  My daughter said, "We should call them "The Hybrid", because they are an offspring of two different baked goods."  I said, "I like it!"

I got the idea to make them from a picture I saw on Pinterest.  I clicked on it and it took me to "My Pampered Kitchen Adventures" Blog.  Click on the link and slowly scroll down and you'll see the picture that intrigued me.  I knew some day I was going to make these wonderful looking brownie/cookie concoctions.  I didn't know it was a Pampered Chef pan at the time.  I had only seen the picture on Pinterest.  While placing an order with my Pampered Chef lady I saw this pan and ordered one.  Not knowing I had the exact pan I needed.  The pan has been hanging out in my kitchen for a few months.  I come a across it every now and then and think I need to make that recipe.  Then life gets in the way.

Well, my daughter was off on one of her surfing trips with friends and I like to send them with a bag of treats even though they aren't kids anymore.  I love surprising them with something yummy and they love getting something yummy.  I decided to make these squares of deliciousness.  Only problem I didn't really have time to make cookie dough or brownie batter.  I decided to follow the blog's recipe exactly and use store bought cookie dough and a brownie mix

 
Thanks to the blog's pictures I could see that she had over filled the pan and I didn't want mine to turn out like that. I wanted neat little squares. I wanted to try and use the smallest amount of cookie and brownie to cover the filling. Some people had suggested that their cookie/brownies got stuck in the pan. I decided to spray my pan with Pam and hope mine didn't get stuck. I felt pretty good that they wouldn't, because cookie dough is the bottom layer and it just doesn't stick. I wasn't going to put in too much brownie mix, so it wouldn't overflow making the whole thing stick. Plus I sprayed my nonstick pan really good with nonstick cooking spray.

 
I did what she had suggested in her blog and used Reese's Peanut Butter cups and Oreos for the filling.

 
I used 1 tablespoon of cookie dough which was one square of the premade cookie dough.

I used about 1 1/2 tablespoons of brownie batter.  I used a cookie scoop for this and it work out well for measuring and neatness.  I just barely had enough brownie mix for 2 pans or 24 cookies.  Had to use my Pampered Chef rubber spatula to scrap the last bit of batter for the last cookie.  It was close.

I baked them at 325 degrees F with my convection oven for 18 minutes.  As you can see they came out perfectly the way I wanted.  No over flowing.  Nice neat delectable squares.
 
To make 24 cookie/brownies I used:
1 package Nestle Chocolate Chip Cookie Dough Bar
1 package Ghirardelli Double Chocolate Brownie Mix
12 (15g ea.) Reese's Peanut Butter Cups (not small snack size, but not regular)
12 regular filling Oreos

Moment of truth... they fell right out of pan. No sticking at all.  I'm thinking that maybe some people used a different pan.  The Pampered Chef one truly was nonstick.

 Either side looks impressive.  You could serve them either way.
I couldn't remember which ones were peanut butter cup and which were Oreo.  My husband said he could tell by looking at the tops of them.  He said that each filling had their own unique circular footprint.  LOL leave it to a man to get all technical about cookies and their filling.
Thanks to him and his technical thinking I was able to save myself one of each cookie before they were all gone.  Most were eaten before they had cooled.
I wanted to wait til mine were cool so I could see how the filling held up during baking.  I was afraid the peanut butter cups melted together and the Oreo filling melted away.  As you can see they held up great.
Not only did they look great they tasted great.  Our favorite was the peanut butter cup cookie brownie.  But don't get me wrong the Oreo cookie brownies did not go to waste.  It's been less than 24 hours and I have 4 out of 24 left to bring to my cousin and her family.  Good thing I bagged them up early or I probably wouldn't have had them.

Friday, August 31, 2012

Using My Fitness Pal on iPhone


I really like the free app better than Livestrong's paid app.  My Fitness Pal is easier to use on the iPhone and it's well... free.
Created by MyFitnessPal - Free Calorie Counter

Friday, August 3, 2012

I Am Inspired!

Yes, I'm still working out 6-7 hours a week.  Yes, I'm still eating healthily.  Yes, I'm still slowly losing weight.  Not only am I inspired to keep up with my healthy routine, but my new figure is inspiring me to want to knit and/or crochet myself things to wear.  In the past I made hats, scarves, blankets, but never sweaters.  I really didn't want to make something big enough to fit me.  On the knitting machine I'd have to make things in strips in order to make something that fit me.  The machine just wasn't big enough.

I still have a hat or two I'd like to get done for my kids in my ever continuing quest to make a hat they'd like to wear.  But I'm getting geared up to actually make something for me to wear.  I have several patterns in mind.  Lots of yarn to choose from.  I need to get through a summer vacation, a hand knit scarf and then I think my knitting machine will be purring away when I get back.

Saturday, July 21, 2012

Best Craft Show Ever!

Being a crafter I've been to many craft shows over the years and I've been really discouraged going to them the past 10 years.  Not by the quality of crafts necessarily, but by the junkie dime store booths that they are letting in probably to help cover the cost of putting on the craft show.  I find it a real turn off.  Less craft more junk.  I can go to the flea market if I want to buy cheap sunglasses and junkie toys.

The Renegade Craft Fair sat right on the line of crafting and artistry.  No junk at this fair.  Yes, there may be some handmade items that are not your cup of tea, but everything was handmade and slaved over.  I enjoyed looking at each booth and talking with a few of the crafters/artists.  I bought a few things.  An adorable gold fish dish towelnote cards with an adorable poodle on them that looks just like my Little Star, a T-shirt with a T-Rex and a Robot fighting for my son, garden bon bons for my daughter and last but not least a brain ring to help with my Halloween fetish.

I found out about this show from Twinkie Chan.  Who the heck is she?  She's a creative crocheter that specialized in food related items I found out about on Ravelry.  I liked her patterns so much I asked hubby for her book for Christmas (makes things so much easier for hubby.)  She has a blog I like to follow called Twinkie's Blargh.  She mentioned she was going to be at this craft fair in San Francisco and I knew I wanted to go to the fair and to meet her.  So, off I drove in hubby's gas economical car.  It took my 2 hours to get there and park.  It really was a beautiful drive.  No traffic.  No fog.  No agendas other than mine.  Gorgeous views.  Great cheap parking.  It was a day made in heaven.

I found Twinkie Chan's booth at about the hour and a half mark.  Despite being harried from preparing for this show she was friendly and sweet as can be when I asked her to sign my book.  She was just as adorable and cute as one would think.  Just as the food she likes to capture in crochet I wanted to capture her and sit her on a cake.  Oh OK maybe I do sound like a weird stalker.  Really I'm not.

I'm in the middle of making two patterns from her book the Pepperoni Pizza Scarf and Gingerbread Man Scarf.  I bought myself a Twinkie handmade original coffee cup cozy too.  It's done and ready to make me smile.  So, if you don't want to make something yourself you can buy some of her handy work.  She did a beautiful job on the coffee cozy, which reminds me of a Red Velvet Cupcake.

Friday, July 20, 2012

Things I Want To Punch In The Face

I discovered this blog (Things I Want To Punch In The Face) and I am so down with it.  This gal (Jennifer Worick) and I are like one.  We feel the same way about a lot of things.  She describes things I want to punch in the face as: "1) an expression made wildly popular by this blog; 2) a humorous way to convey annoyance or frustration over those little things in life that bug; 3) petty peeves warranting a tongue-in-cheek lashing but involving no physical retribution. Synonyms: chap your hide, get your goat, rub the wrong way; Antonyms: make out with, love so much you should marry it, float your boat, blow your skirt up."

It's not as if I'd really punch somone in the face, but sometimes I just feel like it would solve a lot of problems if I could.  Then again maybe that's why the prisons are over crowded.  Crowded with people who couldn't control their urge to actually punch someone in the face.  Fortunately, I have no such problem.

So, in honor of my new found favorite blog I'm going to tell you the thing I want to punch in the face today....

OK Mr. Lazy Ass Muscle Man do you really need to squeeze between the rowing machines occupied by rowers one being myself to get to the treadmills?  Do you really need to save yourself 20 steps by not walking around the treadmills to get on a treadmill and do some.... walking?  Do you really need to bump into the elbows of the people rowing or in my case make me pull in my elbows, so you can do 20 feet less walking before you get on the treadmill and walk.  You're just rude.

Sunday, July 15, 2012

Vitamix - My New Love

I'd been eyeballing the Vitamix blender for years, but $500 for a blender...YIKES!  A few years ago wanting to get more fruits and veggies into my day I bought a juicer.  It was probably around $300.  I did enjoy juicing.  Only problem is I didn't do it as much as I thought I would for 2 reasons.  One it would extract all the pulp/fiber from the fruits and veggies which seemed counterproductive to a health regimen.  Secondly, OMG what a pain in the butt to clean.  All I wanted to do was sit down and enjoy a glass of juice, but I had 30 minutes of washing to do.  Don't dare let it sit and soak or it would be days before I'd get around to the chore and I do mean chore of cleaning it.  I guess there is a 3rd reason I didn't like juicing.  As I said it extracted the pulp and I'd have this big bowl of pulp and it seemed like such a waste to throw it away.  There were recipes for baking up a loaf of something with the pulp added, but it was not appetizing at all.

So, I was at Costco a few months ago and they were selling the Vitamix again.  I had heard from 2 friends and my trainer over the course of several months expounding on the virtues of their Vitamix blenders.  I decided to take the plunge.  At Costco the blender was still $400.  Still seemed steep, but I took the plunge.  I bought a bunch of fruit and veggies at Costco before I came home and began making a smoothie.  I fell in love.  The next thing I made was the broccoli cheese soup.  It showed the blender steaming in the videos that came with the blender.  I just couldn't believe it.  It's true in 5 minutes I had steaming delicious broccoli cheese soup.

These days I mostly make a fruit and veggie smoothie in the morning for breakfast.  I feel like I can't start my day without my zap of healthy fruits and veggies.

And the major big plus of the Vitamix is the cleaning!!  I rinse out the blender and lid.  Add 5 cups of really warm water, 2 drops of dish soap as per the instructions with Vitamix.  Run blender on high for 1 minute.  Rinse out the soap and sit in the dish drainer.  BAM!  Ready for next smoothie.  While it's doing it's 1 minute of cleaning I'm getting the straw for my smoothie and enjoying a sip.

My favorite is the Sailor Man Green Smoothie.  Why its called the Sailor Man I'm not sure.  I would think it would have lime in it to prevent scurvy.  I made it the first few times exactly like the recipe called for.  It came out this gorgeous green color and tasted so good.  Then I started to tweak it to my preferences.  I just don't have vanilla yogurt on hand I had plain nonfat.  So, I use it and add a squirt of honey.  Don't want my smoothie to be sour.  Then I got to not liking having a half of a brown apple waiting for the next days smoothie.  My daughter suggested I just throw the whole apple in.  She's so smart, but I wanted something more healthy and started leaving the apple out and putting in a carrot.  I usually have frozen bananas and frozen pineapple ready for the smoothie, but I occasionally have fresh.  Because I work out so much these days and I'm prone to leg cramps I'll sometimes had some coconut water for some extra potassium.  The added coconut water also helps the smoothie whirl up.  Sometimes if I have frozen pineapple, frozen banana and ice it will become real thick and not easy to drink right away.  Mama needs to drink her smoothie and get to gym!

Below is the original Sailor Man Green Smoothie recipe.  Hope you try it soon it's really good.

1/2 banana, peeled
1/2 cup (80 g)grapes
1 cup (30 g) fresh spinach
1/2 apple, cored
1/4 cup (60 ml) vanilla yogurt
2 oz (56 g) pineapple
1 cup (240 ml) ice

Place all ingredients into the container in the order listed and secure lid.


Select Variable 1.

Turn machine on and quickly increase speed to Variable 10, then to High. If necessary, use the tamper to press the ingredients into the blades while processing.

Blend for 1 minute or until smooth.

Wednesday, July 11, 2012

Last Night's Dinner - Fritata!

It's summer time and the summer squash has come rolling in.  Since I was home alone last night I decided to have a fritata for dinner.  My Grandma introduced me to fritatas my first tip to California when I was 14 years old.  Since it was late in the day when I flew in and she knowing I needed a good dinner she made a fritata.  She was the secretary for a high mucky muck in the California state government.  Can't remember the title off the top of my head.  Anyhow she had a long work day and wanted to make something easy too.  It was very easy....vegetables, eggs and cheese.  It was also very good.

My fritata started off with a dash of olive oil.  I threw in 2 sliced yellow crookneck squash.  Normally, I'd also cut up an onion and mince some garlic.  It was just me and I wanted simple.  I stir fried the squash.  I added garlic powder, onion powder and some Lawry's Season salt.  Then I stirred up two eggs and poured it over the top of the squash right there in the skillet.  I sprinkled some parmesan cheese over the top of it all. While I waited for the egg to set I microwaved some leftover basil sauce I had made the night before with chicken, spinach and feta sausage sliced into it.  I had about 1/2 cup leftover.

The fritata was so thin since it was one serving that I scraped it out of the pan and it looked more like a scramble on the plate.  I didn't care.  I spooned my hot basil sauce over the top and it was a dinner fit for a King.  368 calories.

Friday, July 6, 2012

"You cannot out-exercise a bad diet"

This became obvious to me after about 6 weeks of exercising.  I was working out so hard.  I was sore and tired every week, but knew I was working toward getting stronger.  I was putting all this hard work into exercising and felt I needed to respect the hard work through healthier eating.  I knew it was time to start watching what I ate.  I vowed I'd never go on a diet ever again.  They just never work for me.  Nothing makes me feel more oppressed than tightly controlling what I eat.  I decided this go around that I would just tweak my current eating pattern.  I did eat pretty healthy for the most part.  I needed to do just a few things.

First off I found that I really don't eat enough on a regular basis.  Years of being overweight made me feel I shouldn't eat much every day.  Then I'd have one day that week where I'd eat too much.  The doctor told me I was starving myself and my body was holding on to the fat.

Secondly I ate very little protein.  I really didn't know this until my trainer told me that she wanted me to eat about 80g of protein and wanted me to use Livestrong.com to track my intact of food.  I thought this would be good to make me eat enough every day.  Never dreaming I didn't get enough protein.  After my first week my trainer pointed out that I didn't even eat 25% of the protein I needed.  I found it very difficult the first few months to eat enough protein.  I got a protein powder that I added to a breakfast shake to get me close to eating enough protein.  I started having a little cheese during the day.  I started eating a handful of almonds or a sprinkle of sliced almonds on my cereal every day.  I started putting chicken on all of the salads I ate.  I started eating Greek yogurt, which has more protein.  Now I don't use the protein powder any more.  I am more intuned with eating protein during my day.

The third tweak was reducing my simple carb intact.  I love candy, cookies, bread, rice, potatoes etc.  I knew this was going to be my hardest hurdle.  I crave simple carbs like a addict craves drugs or alcohol.  I've talked with my doctor about this many times over the years with no real solution other than to just gut it out.  Just don't eat them.  That's all well any good until I'm cruising the kitchen in the background I can hear the sound track to the "Jaws" shark right before it attacks.  Fortunately, for me I had quit drinking diet soda.  I didn't know what a big affect it had on me and my craving for simple carbs.  I never had withdrawals from candy, but I did have minor withdrawals from diet soda.  It took me about 2 months to get past wanting one on a daily basis.  When I quit wanting a diet soda that's when I realized that I had quit wanting candy on a daily basis.  I didn't want candy at all.  I didn't want bread, potatoes, rice or any other carb.  My diet at that point consisted of mostly protein and vegetables with the occasional fruit.  I was greatly relieved that I gave myself permission to have candy whenever I wanted it, but I didn't want it.  Now come PMS week that's still a hard week.  That's when having no candy in the house really pays off.  I can gut it out for a week.

Fourth thing I do is common sense and that's make sure I eat enough vegetables and fruit every day.  I've always eaten them, but I just make sure I eat enough.  My motto is "Put it on a bed of lettuce."  By lettuce I really mean a salad that usually consists of lettuce, tomato, cucumber, green onions, carrot, and avocado.  Sometime I'll throw some cabbage in there if I have it.  OH and let's not forget spinach.  I almost alway have half lettuce and half spinach.  If I roast a chicken I dice mine up and put it on my salad.  I've put chili on a salad.  I've found a lot of things go well on a salad.  The salad really plumps up the meal for me.  Makes them main course go further with less food.

The above picture is my favorite breakfast.  I have it nearly every morning.  1/2 cup of Greek nonfat plain yogurt. Diced fruit usually strawberries, but apricots have been in season and they've been really good too.  Then I'll have granola.  Still trying to find the perfect healthy Granola.  This one is Bare Naked Vanilla with almonds 1/4 cup.  I do put a squirt of honey on the yogurt.  The plain is just too sour for me.  I've also found bite sized shredded wheat non frosted is really good instead of granola too.

Saturday, June 30, 2012

Jillian Michael's Podcast - Start From The Beginning

I started listening to Jillian Michael's Podcast not because I particularly liked her, but I did like her no nonsense approach to fitness.  She doesn't put up with whining and backs her exercise opinions up with facts.  I started listening to her podcasts from the first one she did.  I frequently listened to her podcasts when I worked out by myself.  One tip keep a scrap of paper and pen around when listening.  You'll want to take a note or two occasionally.  I had my workout sheets in my storage clipboard that I'd take to the gym.  In my clipboard I keep my workout sheets, a pen, hair ties, a tissue or 2 and chapstick.

It took me several months to get up to current on her podcast, but with every entry she would answer a question I had in the back of my mind.  The first question I had was what sort of diet should I go on?  Her answer don't go on a diet.  Eat healthy, eat clean (organic when you can) and don't eat more calories than your body needs.  Simple.  I can do that.  Sometimes I do feel like I've restricted myself too much and I feel a little crazy like there is nothing in the world I can eat.  That's when I take a deep breath and get out an old Weight Watcher cookbook and make a few recipes.  It reminds me that the world is open to so many possibilities.  My latest recipes came from "Take-Out Tonight."  I made 2 of the italian recipes.  I took them into my trainer to see what she thought.  She thought they looked good just watch the sodium.

My review of Jillian's Podcast is I like it.  Her sidekick is a hoot and makes me laugh out loud.  Keep a pen handy and enjoy.

Still Exercising Can't Hardly Believe It

I don't have many cooking posts any more as I'm watching what I eat, which in turn resulted in me watching what every one eats. Mostly, I want everyone in my house to eat healthy, but I also don't want anything around to tempt me. I'll still make special sweets for birthdays and I have 2 coming up here in a month or so. What have I been doing instead of cooking and crafting? I've been learning to exercise.

I've lost 55 pounds in the past 7 months. It didn't start out as a weight losing venture. It started out as a "make peace with exercise" venture. I've discovered a lot of things along the way. I don't hate exercise nearly as much as I thought I did. Enjoy it? I wouldn't say that, but I've learned that I really need it.


In October of 2011 I was a marshmallow. I'm not even exaggerating is the sad fact. I could get along fine in my everyday life if I kept things simple. I was walking down the stairs at Kaiser and I discovered that I really had very little muscle tone in my legs. I thought if one thing goes wrong and I start to fall I won't be able to catch myself. I hung onto the hand rail for dear life. Not comforted by the fact I was hanging on with my equally marshmallow arms.


It wasn't until I was adding up the receipts for a near death incident with my poodle. She's fine now thank goodness. When I reached the Vet bill total I wasn't shocked by the total. In the scheme of things I thought I got off pretty cheap considering how sick she was. There were a lot treatments, medications, surgery and investigating done. The bill came to $2400. I was surprised that I was so comfortable with that amount. I was comforted that she's healthy and that's ALL I had to pay. Then I got to thinking of all the weight loss schemes I'd turned down over years, because I wasn't willing to spend that much on myself. I was shocked that I wouldn't consider spending $2400 to save my own life.

It was the slap in the face I needed. I decided I would spend that much to save my life. I was hugely overweight and out of shape and it was only a matter of time before I had a life altering event that would force me to do something about it. Why wait until I have a heart attack, a stroke, or diabetes? I need to do something NOW! I gave great thought to what I would spend that kind of money on. Diets have never worked for me. Sure I'd lose weight some where between 25 and 40 pounds, but I'd put it right back on. What do they say "Insanity is doing the same thing over and over again but expecting different results." That's the way I suddenly felt about diet plans. It was insane for me to even consider a diet plan. The one part of the equations I've ignored all my life is the exercise part.

I thought long and hard about why I won't exercise. I don't like it. I don't like being sweaty. I don't like being uncomfortable. I don't really know what to do at home or at the gym. I don't know how hard to push myself. I don't know what is too much exercise. I don't know what is too little exercise. I'm embarrassed. I feel silly. That's when I decided I was going to spend my money and hire a trainer. I needed an expert to help me figure this all out.

I called the gym and I had 3 free 1/2 hour session on the books that I had never used. I'd start there. I made an appointment with a name that sounded familiar. The gym called back and that person couldn't do it. That's when they asked if I minded being switched to a new gal named Michelle Young. I didn't know it then, but that was the best thing that could have happened to me.

She's well trained. She's young, but not too young. She prompt, cooperative, encouraging, yet pushes me when I need to be pushed. She answers my questions and will do research if she doesn't know the answer. She'll patiently listen to my whining and then give me good reasons why I'm exercising. She reminds me and points out how far I've come. She's empowered me to be able to come to the gym and know what to do. I don't feel silly. I'm no longer embarrassed. With her help and the Polar Heart Monitor she suggested I buy I know how hard to work out. I also know how little to work out when I'm pushing too hard.

As I said dieting wasn't in the plan and still isn't. For years I thought I'll get my diet under control and THEN I'll start to exercise. What I discovered was as I learned to exercise as I got stronger I lost small amounts of weight without watching what I ate. I learned that I wanted to start watching what I ate. I wanted to make better choices. I felt when I'm working this hard to feel better I don't want to mess up the hard work with bad food. Exercising made me want to eat healthier. Dieting never made me want to exercise.

The first thing I did was cut out diet sodas. I did it mostly to get the main source of chemicals out of my diet. No artificial colors or sweeteners by the gallon for me. This was the 2nd best thing I did for myself. 

What I found out was my super strong sweet tooth all those years has been triggered by the artificial sweeteners. Dr. Oz talked about how artificial sweeteners can cause one to gain weight. The explanation fit me to a T. You can read it here. 

It was difficult to drink water all day and not have diet soda the first 2 months. I really had withdrawals. Not just physically, but mentally. I didn't realize what rituals surrounded my drinking of diet soda. Picking my child up from school I would take 24 ounces of diet soda to drink while I waited. Kids are in bed I'd have my "I'm off duty" cold diet soda. No little kids wanting to dip their lips in my drink. Once I got past the 2 month mark I've been fine with water. Occasionally I'll have herbal tea, but I'm not really a tea lover. Occasionally, I'll have some soda water with a twist of lemon, a squeeze of lime or some cranberry juice.

My sugar cravings are next to nil. It's a strange feeling for me. I use to seek out sweets and carbs like a drug addict seeks out drugs. Again I'm not even exaggerating. I've talked to many doctors over the years about it and got no answers or help in regards to it. Diet soda who knew?! I had candy stashes around the house to keep my husband and kids out of my candy. I'd get mean and defensive of these stashes if they were discovered. I moved them like a dog moves a bone when discovered. I didn't share and was insulted at the suggestion. I think "buy your own candy" was said a time or two over the years. It was the candy talking.

It wasn't until I wasn't eating candy that I found out how many stashes I had. I thought just one in the kitchen, but one night my daughter wanted a sweet and asked if I had anything. I checked my stash and said no. Then she said what about your other stash? I thought I don't have one, but then thought again. She followed me around the house and was shocked at my inventiveness. I had 5 areas that I stashed things in. It was a good night as she helped me clear them out. It was really only a matter of time before I probably would have eaten them all. I just had no craving and hadn't looked for them. 

When someone wants to know what secret diet I'm on and how I've lost 55 pounds I say, "I know it will be disappointing to find out, but exercise. It really works. Damn it!"

As for diet I still don't diet. I do watch my calories with a free account with myfitnesspal. Julian Michaels reminded me it's nothing special "calories in calories out." I can fill my whole daily allotment of calories with jelly beans if that's what I wanted to do, but I'll probably have a big stomachache. She has an awesome free podcast. Check it out on iTunes. 

I try to eat more fruits and vegetables. Not rocket science we all should do this. I did find out I haven't eaten enough protein for years. So, I make sure I get enough protein every day. I make sure I eat 3 meals a day. Sometimes a small snack between meals. I don't snack often and I'm working on getting better at spreading out the food over the day. I seldom eat simple carbs in my evening meal. No potatoes, rice, bread, pasta kind of things. I don't crave them any more and I don't need them. I don't eat anything after dinner any more. I don't crave that evening ice cream like I did. Now I'm use to not having it.

I'm stronger. I'm lighter. I feel better. I look better. I live by two simple mottos "Don't say no to exercise" and "put it on a bed of lettuce." Everyday I strengthen my commitment to exercising for the rest of my life. Not because it needs to be done, but because it has to be done.

Wednesday, May 2, 2012

Oreo Cookies on a Stick

I saw Oreos dipped in chocolate on a stick online and thought how cute, yummy and quick would these be for a bake sale at my daughter's school.  I did a search online.  Read up on how others had made theirs and decided on a couple things.  I didn't want to open each cookie up to put the stick in as a couple sites recommended.  I definitely wanted to use popsicle sticks verses the white candy sticks.  I just loved the look of the stick.  I also loved the look of the white candy coating with sprinkles.

What I needed... 2 packs of "Double Stuf" Oreos, one pack of popsicle sticks, 2 - 12oz. bags of white candy coating (I used Guittard), and sprinkles of your choice.  This made 52 Oreo pops.  I think I had about 6 broken cookies that didn't even make it to the stick process.  DH was glad to put them out of their misery.

For each cookie I measured how far I wanted the stick to go in then I pushed it into the cookie.

I found that probably half the cookies were either already broken or I broke them pushing the stick in.  Not sure which.  Holding the cookie semi firmly with fingers and thumb of one hand as I pushed the stick in kept everything together.  I found the frosting held the cookies together nicely and that the broken cookie wasn't a factor in the finished product. 


Only one time out of 52 did a piece of the broken cookie dropped off into the chocolate. I just picked it up and stuck it back in place. No problem.


52 cookies on a stick waiting to be coated.

 After a few air pockets emerging on the sides I decided it was better to coat the center of the cookies before coating the top and the bottom.  I never dipped the cookies as I didn't think they stay on the stick and the broken cookies might fall a part.

  I used a spoon to drizzle candy coating around the center frosting section
 Then I spooned some coating on the top and using a "saucing a pizza like swirl" I spread the coating.  Flipped the cookie over and repeated.  I then gently tapped side of stick with my finger to loosen up the excess candy coating to drip back into the double boiler.  Good thing I did this as with 2 - 12oz bags of candy coating I was JUST able to coat 52 cookies.  Would not have been able to do 53.
 I put all the cookies on wax paper.  It was a little too warm in my kitchen yesterday for them to set in a timely manner. I ended up putting them in the freezer for 15 minutes.
 Since these were something quick I wanted to try for a bake sale I didn't bother standing them up to set and putting sprinkles on both sides.  For a party at my house I might do that.
 They just turned out adorable.
 They looked like something one would have to buy.
 I know they will be a hit at the bake sale.
 I could have sent them over like this, but I was feeling very crafty yesterday.
And I wrapped each one in a little bag.

Saturday, March 31, 2012

Quick and Delicious Chicken Empanadas

My daughter needed 15 culture points for Spanish and asked for ideas.  I said I had always wanted to try making empanadas.  What did she think?  She loved the idea.  I wanted to find a recipe that would be super simple as we didn't have a lot of time to really cook from scratch... after school... after track practice and before bedtime on a school night.  It had to be good though.
I found a recipe from "Semi-Homemade" Sandra Lee.  It really seemed very easy and I had all the ingredients but the pie crust.

I went one step further than Sandra Lee and I bought premade pie crusts from Pillsbury.  My folks use them at Thanksgiving for their pies and they always tastes just fine.  I didn't have time to mix and roll out pie crusts

This recipe was surprisingly SO delicious we are definitely going to make them again.  It was a great mother/daughter cooking project seeing as my daughter doesn't like to cook. 

We had an assembly line.  She worked on making the filling.  While she was doing that I cut out the pie dough.  After the filling cooled I would fill the pie dough.  It was a messy affair that took finding a technique to keep the filling in as I pressed it closed.  After wetting the edge of dough using my teaspoon cookie scoop I would plop the filling on the dough.  Then I would fold the piece in mid air with the fold facing the ground.  That way I used gravity to keep the filling in the empanada as I pinch it closed.  I would first pinch the dough closest to the fold on each side.  This made a cup like structure that made all the difference in the world in keeping the filling in.  I then gently pressed up to the top of the half circle evenly on both sides.  I handed the empanada off to my daughter who then pressed the edge with a fork and forked the top of the little pastry.  She lined them on on a cookie sheets and baked them.  Using 2 packages of Pillsbury pie crust and my 2 1/2 inch cutter I got about 64 empanadas.

They were a big hit at school.  She got 25 points for her Spanish sentences about making empanadas and the class got to eat them.

Chicken Mini Empanadas (with my tweaks)

Ingredients

  • 2 Pillsbury Pie Crusts
  • 1 11-ounce can white chicken meat, drained
  • 1 cup chunky salsa
  • 1 3-ounce can sliced ripe olives
  • 1 cup shredded Mexican cheese blend
  • All-purpose flour, for dusting

Directions

Preheat the oven to 400 degrees F. In a medium saucepan, combine the chicken, salsa and olives. Bring to a boil, then reduce the heat and simmer 5 minutes. Remove from the heat and stir in the cheese. Cool slightly.

On a lightly flour-dusted surface, unroll the dough that has been brought up to about room temperature. Using a 3-inch-round cutter (my cutter was about 2 1/2 inches), cut out 36 circles, rerolling the scraps as needed. Place about 1 teaspoon of chicken mixture in the center of each circle. Moisten the edges with water. Fold the circles in half and pinch to seal. Pierce the tops with a fork.

Place the empanadas on a baking sheet and bake 10-12 minutes, or until golden. Serve hot.
Lynne's note:  A couple of the empanadas didn't seal despite wetting the edge, pinching close and pressing edge with a fork.  It worked out OK as none of the filling came out.  We used these "ugly ones" to taste test.

Sunday, March 11, 2012

Zingy Zig Zags is finally finished!


Nearly 3 years later I finally got this finished.  I had connected this project with watching football.  So, it took several football seasons to get it done.  I only worked on it while watching football.  Since the 49ers were doing so well this season I got very close to finishing.  When the 49ers didn't make it to the Super Bowl I decided to go ahead and watch it and work on my afghan.  Still not finished I then decided to keep working on it until it was done.


Fringe and all it's done!

The only bad thing about his afghan is it's from a book about using up your scrap yarn.  I had to buy more yarn to finish it.  I was 10 inches away from finishing it and I just couldn't stop it would have been too narrow.  I can't believe my "use up the scraps" afghan has caused more scraps.  I have lots of yarn left over.  Considering making another afghan from the "Scrap Afghan" pattern book or will it be creating a vicious circle?  I was lucky this time that the colors of yarn were still being sold.  I may not be so lucky next time.

The one family member who I think loves afghans the most couldn't wait to relax on my nearly made blanket.  Turned my back for a second and who was already laying on it?  Yes, Poodle-Doo couldn't resist a finely crafted homemade afghan.


Saturday, March 3, 2012

New Recipe - Sticky Biscuits

We like to make Monkey Bread every now and then around here.  It's not complicated, but it is time consuming.  When I saw this recipe for using refrigerator biscuits it reminded me of Monkey Bread.  I had to give it a try.  The only minor problem I had was I only had 1/4 cup of pancake syrup.  I had considered using some pure maple syrup from the fridge.  Maybe combining it with some Caro syrup, so the maple flavor wouldn't be so strong.  In the end I thought there was so much butter and brown sugar it would be OK only using the 1/4 of syrup I had.

 I was right it was just as sticky as anyone would want it.
I love the toasted flavor of the nuts.  Personally I don't think they should be optional.  I used only almonds today, but pecans would be really good too.

I took the liberty of changing the name of the recipe.  It was originally called "Sticky Bun Breakfast Ring."  Check out her blog called "The Jones Way."  With a recipe this yummy, she's bound to have more great things over there.

Sticky Biscuits

2 small tubes refrigerator buttermilk biscuits
OR 1 1/2 tubes Pillsbury Grands! buttermilk biscuits
3 Tbsp. butter, melted
1/2 cup pancake syrup (any brand you like
1/3 cup packed light brown sugar
1/2 tsp. cinnamon
1/4 cup chopped pecans, optional
1/4 cup chopped almonds, optional

Spray a fluted/Bundt pan with non-stick spray

Combine the melted butter and syrup in a small bowl and set aside.

In another bowl, combine the brown sugar, cinnamon, and nuts (if desired).

Place about half of the syrup mixture in the bottom of the pan. Then sprinkle half of the brown sugar mixture on top. Lay the biscuits on the bottom of the pan, overlapping edges (closely together) to form a ring. Top with remaining syrup and sugar mixtures.

Bake at 375 degrees for approximately 20-25 minutes or until golden brown.

Cool for 1 minute in the pan, then invert onto a serving platter and enjoy.

** I ended up using 1 1/2 tubes of the Pillsbury Grands! refrigerator buttermilk biscuits (1 tube didn't seem like enough) and baked it for about 30-40 minutes.

So simple.


So delicious!